• A little bit about me…
  • Design Teams – Past and Present
  • FTC Disclosure

My Purple House

My Purple  House

Category Archives: Tutorial

SCS – Birthday Candles – TLC

16 Monday Nov 2020

Posted by Lyn T in Birthday, CAS, SplitCoastStamper, Sweet 'n Sassy Stamps, Tutorial

≈ Leave a comment

Today I get to host the Technique Lover’s Challenge at SplitCoast Stampers and I have gone pretty clean and simple with a masculine birthday card (out of the norm for me haha!).

I saw a card with these fun candles and thought this would be a great challenge! I searched though everything to make sure it hadn’t been done before and couldn’t find it so this is it! The challenge is to create a card with one or more candles…

Here is the inside (the sentiments were from the new Humorous Birthday Innies from Sweet N Sassy Stamps – I mixed 2 of them.)

This was fun and easy and I love the finished result!

How to make the candles (or at least how I made them):

  • I started with 2.5X4″ paper. You can go taller than 2.5″ if you want but much longer than 4″ will create a candle that it so round it may not easily fit in an envelope.
  • I glued my twine down to one of the short ends then did the same for all of my of papers, which I found in a long unused pad of designer paper (this challenge is a win-win since using my stash is a part of it)
  • By the time I finished gluing the last twine, the first was dry so I put a line of glue down beside the twine and started rolling the paper up adding a line of every few turns to hold it in place.
  • When I finished rolling all of them, I checked the length. I decided mine were a little too long because I put the sentiment up so far on my card so I cut off a bit (and because I am crazy, I ran the bottoms over a piece of sand paper to smooth them.)
  • I dipped the bottoms in some neutral ink so the white wouldn’t be too obvious (mostly because of the dark colors I chose)
  • Finally, I trimmed the “wicks” to the desired length and glued them onto my card.

 I can’t to see your cards – HAVE FUN!

Thanks for stopping by!

Lyn

Advertisement

Share this:

  • More

Like this:

Like Loading...

SNSS – In a Digi World… In this Together!

16 Thursday Apr 2020

Posted by Lyn T in CAS, Sweet 'n Sassy Stamps, Techniques, Tutorial

≈ Leave a comment

Have you had a chance to play with some of the new digis at Sweet N Sassy this month? Since we are all at home, they decided to go digital on some fun sets and I am in love with all of them! Today, however, I am featuring the new In This Together set. It has some many sentiments that are perfect encouragement to send out to those people you love and miss right now. There are also three stamps that can be sized, flipped, positioned however you want! HERE is a quick (not professional haha) how-to of me setting this set up from download to print…

So… I have three different cards using this ONE set and they are all pretty different! All of these were set up on a Word doc and printed – some were printed on Copic friendly Xpress-it paper and the last one was printed on lightweight Canson watercolor paper.

First, I created a scene in the corner of my page using the tea cup with flowers in a pretty big size. I wanted it to be a little off the card so that’s how I placed it. I also added the It’s going to be ok sentiment. To test that it would fit right on my card I added a text box beside it that was 4.25×5.5. After I confirmed the spacing was good, I deleted the text box as they can get tricky if you leave them there… I also added some smaller sized images on the page as well as a bunch of sentiment and printed it out… I love to keep these printed pages on my desk, pop on some music, and color a little while with no card making plans – just relaxing and coloring….So great for stress relief!!

NOW for the cards that came of that creative time…

For the first card, we have a CAS card. I cut out my scene and mounted it on some coordinating blue cardstock and adhered that to an A2 size card. At this point it seemed a little bottom heavy so I pulled out the new Stamp of the Month Friendship is a Blessing and used the Dear Friend piece. I love this new set – it is great for inside and outside card sentiments. I definitely see this being a go to stamp for me!

For the second card, I used one of the smaller cups and one of the sentiments and added it to a mixed media back ground I had in my stash. Serendipity I think 🙂 I had a fun die from Mama Elephant that you could run ribbon through. I wanted to use this for my sentiment but I couldn’t find the right color of ribbon…so I found a scallop border die, and used on it two sides of a strip of the blue I mounted my card’s front on…paper ribbon woohoo!! My final card is also CAS but it is a little different. I followed the same steps to create a scene that I mentioned above but I used lightweight (90lbs) Canson watercolor paper – think less expensive pad from Michael’s. It isn’t going to do well with a lot of water as it does pill; but it has that pretty watercolor paper texture and will go through the printer whereas heavyweight generally doesn’t. AND it was great for this project.

I took the flower border image and copied it twice. One I put on top of my Mother’s Day sentiment (In the set) and the other I flipped and put it under the sentiment. It created a sort of loose wreath for the sentiment to nestle into. I used my Arteza watercolor pencils and colored my image in the areas I wanted to be my “shadows” and to create the highlights, I blended those areas out. NOW here is where I switched things up to accommodate the fact that this is a digital stamp, therefore, printed with inkjet ink (which isn’t a friend to water) I used my Spectrum Noir Sparkle pen to blend instead of water. It blends great, it looks watercolor’y’, and it is sparkly (that doesn’t show up here but it is 🙂 )I mounted it on some matching cardstock and adhered it to a top-folding A2 card.

Mother’s Day Card?…Check!!!

I hope you were inspired today. Digital stamps are super fun and super versatile and they conveniently store in a folder on your computer not on a shelf haha!

ALSO – have you seen the new April release of clear stamps? There is a super fun hop happening with prizes… Start here – Sweet ‘n Sassy Blog and have fun!

Thanks for stopping by!!

Lyn

Share this:

  • More

Like this:

Like Loading...

TLC756 – Dot Art Mandala

19 Monday Aug 2019

Posted by Lyn T in SplitCoastStamper, Sweet 'n Sassy Stamps, Techniques, Tutorial

≈ Leave a comment

It is the third Monday of the month and I am once again tasked to host the Technique Lover’s Challenge. Today’s challenge is a little outside my normal style,  but I think you will have fun with it.

I have been seeing a lot of dot art lately and when I saw dot mandalas on Pinterest, I thought it would be fun to try it on a card. Now, this technique is one that may require practice(I know I need more 🙂 ), but I searched and found some video tutorials to get me started and found that it was relaxing and fun and if not perfect, the first run still makes me happy.

I started out with a 6×6 panel and after I created my Mandala, I cut it down to to fit my card front (I trimmed off a piece that was a little smeared) and finished it with a simple sentiment.

Though there are specific tools out there for this technique, I found the creative use of household items in THIS TUTORIAL to be helpful. THIS TUTORIAL is the one I followed for my card front and she also uses simple tools that I found readily in my crafting supplies.

A few tips based on my mistakes (haha!)

  • I recommend is you use a thicker paper for this project. I used Fabriano Black 140lb paper. I think using watercolor paper would be good too. The acrylic paints are heavy and wet and I am not sure thin paper would be able to hold it.
  • Let it dry before cutting it, gluing it, etc – the peaks can stay wet longer than you think. I think you can dry it with a heat tool, but be careful not to heat too much or the paint may bubble.
  • Turn the page as you go in order to keep your hand out of the wet paint.
  • Don’t press the tools to hard or the dots get a bit wonky (mine did this – sigh)
  • Don’t get to bogged down with the patterns – just have fun with it!

I hope you are inspired to try this technique – hope over to Splitcoast Stampers and join in if you would like to!

Thanks for stopping by!

Lyn


Share this:

  • More

Like this:

Like Loading...

Sweet N Sassy Stamps – Christmas in July Blog Hop!

24 Wednesday Jul 2019

Posted by Lyn T in Sweet 'n Sassy Stamps, Tutorial

≈ 28 Comments

It is time for a blog hop! You should have arrived here from the very talented Lee Ann Barrett’s blog. If not, hop back so you don’t miss anything:)

Christmas in July at Sweet N Sassy Stamps means lots of inspiration, a sale, AND a chance to win a prize! OH MY!

First for the inspiration…We are so thrilled to be joined today by our new affiliates! I know you will be inspired by them!

Second for the sale…from today (the 24th) Until Wednesday the 31st, all CHRISTMAS AND WINTER sets are on sale for 25% off (no code needed). Are you getting excited?

Finally for the prize… comment all along the hop and you will have the chance to win a $50 gift code to the Sweet ‘n Sassy Stamps shop (You read that right $50!!) So be sure to leave lots of love as you hop along!

OK now that the details are out of the way, here is my project for you… Last year I created a card with a night scene and a silhouette using Old-Fashioned Christmas. I  decided it would be fun to create a set of gift tags. Below I have a picture tutorial for you on the process. I think I can load the stamp into my MISTI and create lots of these in a single sitting which is really exciting! What do you think?

Here are the steps:

  1. Supplies for my tag. I also later grabbed tumbled glass ink and a white acrylic paint.

2. I punched a hole out of a sticky post-it and tore a paper towel to give a ragged edge…both pieces of the post-it and the paper towel are masks. (the hole size is up to you!)3. The circle is positioned where I want my moon to be. The paper towel masks the ground. I pounced the ink over the paper towel and then blend upward going lightly around the post it so the moon has a glow.4. For a richer color, I repeated the previous step with seedless preserves though with a light hand this time.5. Remove the mask for the next step but keep it! Ink up the silhouette with black ink (I used black soot because it was there.) My image is Old Fashioned
Christmas by Sweet N Sassy.6. Go around the edges of the tag and follow the lines of the image somewhat with black soot.

7. Add the circle mask back over the moon. For blending purposes, go back again with chipped sapphire and again with black as needed to get desired results.8. Gently touch the ground with tumbled glass leaving white areas (it is a snowy ground). I used a paint brush to lightly brush on the darker blue under the trees for some shading but this can be tricky so skip if you want to.9. Remove the circle mask and apply the outside piece around the moon. Using the paper towel as a mask gently pounce the antique linen (I didn’t end up using the other one.)

10.  Move the paper down and do the same thing in order to get a cloud like look.

11. I placed my hand over most of the silhouette (because I didn’t want to take the time to make another mask and I was ok if a little splatter got on it) I splattered some white paint over the background  – it is stars or snow, either one, but it really adds to the look.

12. A white gel pen for some highlights on some of the branch tops (where the moonlight would hit) and some twine to loop through the hole finishes this one up.

I hope you were inspired! Next on the hop is Monika Davis with even more Christmas goodness! I hope you have lots of fun!

Thanks for hopping by!

Lyn

Share this:

  • More

Like this:

Like Loading...

SNSS – Texture Tiles 4 (x3) – Bee Amazing!

03 Sunday Mar 2019

Posted by Lyn T in Bible Journaling, CAS, Sweet 'n Sassy Stamps, Techniques, Tutorial

≈ 1 Comment

Hi Friends!

Today I have some more fun projects using one stamp (well two really) from Sweet N Sassy creating three looks. The new Texture Tiles 4 makes for some great background and to tie my projects together, I added the bee from Sweet as Honey. Of course I have also used other sets (I will point them out as I go) but these are the focus on all of my projects.

My first project is a mixed media art journal page (in my 6×6 journal). This is my more complex project as it uses the most stash supplies and got me the inky-est 🙂

Recipe:

  • Background – Tim Holtz Tissue Wrap Melange; Distress Paint in Peeled Paint, Mowed Lawn, Broken China, Cracked Pistachio, Mermaid Lagoon
  • Background stamps – Texture Tiles 1 using Archival Inks Manganese Blue
  • Splatters – White and Black Arcylic Dylusions
  • Corner texture – Tim Holtz Stencil with Black Modeling Paste (TCW)
  • Sentiment (big) God is For You Clear stamp set from SNSS inked with Gina K Black Amalgam Ink, (little) From Tim Holtz Small Talk sticker book.
  • Border Image – Texture Tiles 4 stamped repeatedly around the edges over and over.
  • Bee image from Sweet as Honey stamped with Gina K Black Amalgam and colored with Copics Y17, Y19, Y15 and W0, W1, W3, W5 (with Wink of Stella on wings)- popped up with foam felt and adhered with Multi Matte Medium
  • Highlights added with White gel pen

My Second project is a less complex and uses the four plaid tiles to create “quilty” look.

I used a circle stitched die from Simon Says Stamps and a Circle die from Spellbinders to cut out the image using the out of the box die technique. I added a foam dot under the bee’s wings to make them look more dimensional.

Recipe:

  • For the Bee, I used a circle stitched die from Simon Says Stamps and a Circle die from Spellbinders. For the squares, I used square stitched die from Simon Says Stamps and a square die from Spellbinders.
  • Bee image from Sweet as Honey stamped with Gina K Black Amalgam and colored with Copics Y17, Y19, Y15 and W0, W1, W3, W5 (with Wink of Stella on wings).
  • Background Image – Texture Tiles 4 – all four stamped with Gina K Black Amalgam Ink on Neenah Solar White
  • Sentiment – So Thankful
  • My background paper is cut with A Jillian Vance Design Basic Polka Dot Die

My Final Project is a Clean And Simple card on kraft.

Recipe:

  • My rectangles are all cut with A Jillian Vance Design Basic and/or Polka Dot Dies
  • Background Image – Texture Tiles 4 – stamped with Versa Mark for a tone on tone look
  • Bee image from Sweet as Honey stamped with Gina K Black Amalgam and colored with Polychromos pencils. I stamped right on top of the plaid background and colored over it.
  • Sentiment – “Bee” from Sweet as Honey and “Amazing” from Bitty Minnie Alpha
  • I added twine and enamel dots then popped the center panel up with foam felt

I hope you are inspired – see how you can stretch your stamps by trying multiple ways to use it. And no matter what else you do, HAVE FUN!!

Thanks for stopping by!

Lyn


Share this:

  • More

Like this:

Like Loading...

SNSS – Girl Power (x3) – Teal and Red

22 Friday Feb 2019

Posted by Lyn T in Bible Journaling, CAS, Sweet 'n Sassy Stamps, Techniques, Tutorial

≈ 2 Comments

Hi Friends! Today I have some fun projects using the new Girl Power 2 set from Sweet N Sassy Stamps. I have also used other sets (I will point them out as I go) but this one is the focus on all of my projects. [By the way, if you feel like you just need any of these stamps, I have a discount code for you (woo woo!!). If you spend $10, LYN10 get you 10% off your entire order.]

For these projects, I wanted to show how a single stamp could be used in different styles and complexities (is that the right word? I’ll go with it :)). To show this versatility, I decided to use the same color pallet on them and red and teal is the color combo I chose. These projects are all different but the each make me smile out loud! So here we go…

My first project is a mixed media art journal page. I saw a 6×6 disc bound journal and felt ready to commit to that as it was less intimidating than a bigger journal with two pages to cover. This is my more complex project as it has acrylics, and archival ink, and texture paste, and Copics, and Washi tape, and a masked (many times over) image. I even pulled out my gelliplate and got so messy and had so much fun. If you haven’t tried a journal page – I encourage it. It is very rewarding.Recipe (in order of use haha):

  • Background – Acrylics Dina Wakley Acrylics Ocean, Turquoise, and Sterling
  • Background stamps – Texture Tiles 1 using Archival Inks Cobalt and Paradise Teal
  • Splatters – White Gesso and Sterling acrylics
  • Corner texture – Stencil with texture cream (Momenta Art-C in Platinum)
  • Sentiment (big) Be Unique Clear stamp set from SNSS, (little) typed on computer
  • Image – Girl Power 2 Masked over and over. Main image colored with Copics R24, R27, R29(shirt), E53, E55, E57, E59 (Hair), E00, E21, E11(skin) Other images colored with warm grays – adhered with Multi Matte Medium
  • Washi Tape – not sure brand
  • Outline image with Stabilo All Pencil and water brush

My Second project is a less complex and uses only a few dies, designer paper (from my stash)some tulle, and sequins. There is a mask though 🙂  It is a shaker of sorts…Recipe:

  • Spellbinders circle dies (two sizes so I could add the frame on top) This card allows you to see through to the inside
  • Designer paper from my stash
  • Tulle – folded in half filled with sequins and closed up with score tape the taped down between the paper layers and the card base
  • Image – Girl Power 2 (I chose the girl that looks like me) Keep in Touch Too (sentiment) and Home for the Holidays (gift). I stamped the gift first then masked it then stamped the girl.
  • My background paper is cut with A Jillian Vance Design Basic Polka Dot Die

My Final Project is kind of Clean And Simple but still has a few steps. It still uses a mask (I cut them out so I wanted to use them as many times as possible I guess haha!) I cut out some frames, stacked them and colored up my image. to pop into the frame. I wanted this to look like a selfie pic of me and one of my best friends so I chose girls with our hairstyles. For fun I decided to try to video it. It isn’t awesome but it is my first time doing this and the video stopped and I had to add in the end…oh well – feel free to check it out if you want to HERE)

Recipe:

  • Spellbinders Rectangle and Square dies (taped together to create a frame and cut multiple times to stack and remain the same).
  • Image – Girl Power 2 Masked over and over. Main image colored with Copics R24, R27, R29(shirt), E53, E55, E57, E59 (Hair), E00, E21, E11(skin)
  • Sentiment – You and Me set from SNSS
  • My background paper is cut with A Jillian Vance Design Basic Polka Dot Die

I hope you are inspired to pick up a stamp set and see what other ways you can create with it. See how you can combine sets for a single project and most of all, this should be fun so make it FUN!!

Thanks for stopping by!

Lyn


Share this:

  • More

Like this:

Like Loading...

Splitcoast Stampers TCL Challenge – Spooky Sky

15 Monday Oct 2018

Posted by Lyn T in CAS, SplitCoastStamper, Techniques, Tutorial, Watercolor

≈ Leave a comment

Today I have a simple little technique I found quite by accident – I just love happy accidents… don’t you?

Halloween is just around the corner so this technique, to create a cloudy, spooky Halloween sky, seems like perfect timing!  The artist explains the technique well and her example is super fun. I want to give her credit so to see the technique, go HERE.

I went CAS with my card and using the bat from Trois Fantomes (digi by Vera Lane Studios) and a simple sentiment from an old Papertry nk set (Tiny Treats Halloween), I let the background carry the card – and boy does it!

I hope you are feeling inspired and come on over to SplitCoast Stampers to join in the challenge!

Thanks for stopping by!

Lyn

Share this:

  • More

Like this:

Like Loading...

Splitcoast Stampers Challenge – Hammer Time!

19 Monday Mar 2018

Posted by Lyn T in CAS, SplitCoastStamper, Techniques, Tutorial, Watercolor

≈ Leave a comment

Happy Monday Everyone! It is the third Monday of the month which means I get to host the challenge at Splitcoast Stampers.

So, I am not sure about you but I love the look of mixed media, but I am not very good at at (or if I am honest, I am scared of it…). Today’s challenge technique can be used one of two ways. ONE is to create a mixed media-ish look, or TWO, just to add random texture to any card.

This technique is hammed embossing. It is fun and simple so get ready…
IT’S HAMMER TIME!

FIRST – You will need your paper, ink, embossing folder, and an image or sentiment.
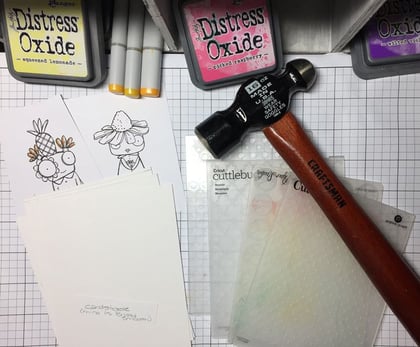
SECOND – Ink up your background, (This can be as simple or complicated as you want it to be.)

THIRD – Insert your background into an embossing folder and with your hammer tap in random spots – you need to tap firmly but don’t pound or you can crack your folder and I mean really, what did that poor embossing folder do to you??

NOTE: I find that if you use thinner paper (I used Bristol not thick watercolor paper) and if you don’t do it on top of your pad of paper (like in the picture ) the imprint is better.

Also, I like to open the top very gently to make sure I have enough embossing and if I want more, I close it back and tap in a few more places.
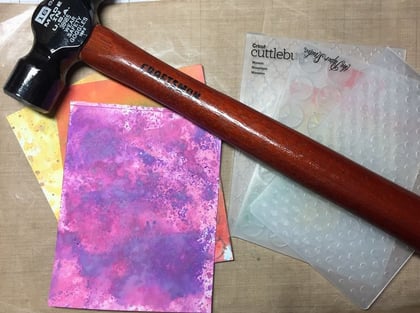
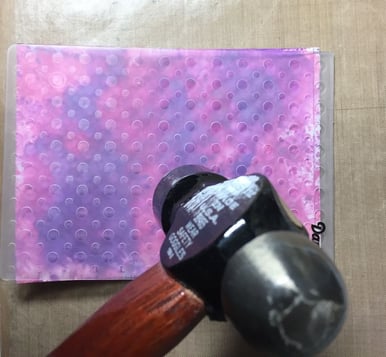
Once you are happy with the results, you can either be done or you can step it up… I like to take an ink blender and ink (the Distress Oxides work great, but any ink should work) and VERY lightly run over the raised areas so they POP!
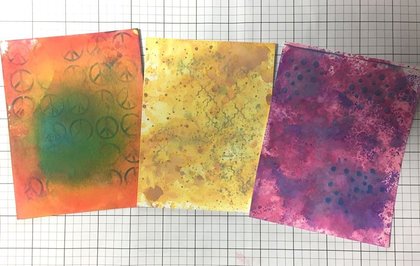
Now you are ready to put together a card!!

Here are my samples using the three backgrounds above.

I’d love you to come play along with the challenge. Check it out HERE!

I hope you are inspired! Have a great one!

Lyn

Share this:

  • More

Like this:

Like Loading...

LMMS #148 – Thanks for your service!

06 Thursday Oct 2016

Posted by Lyn T in Little Miss Muffet, Tutorial

≈ 2 Comments

Badge for Sidebar

Yep ~ it is time for another “Anything Goes!” challenge at Little Miss Muffet Stamps – Challenge #148. And this week we have new design team members to introduce so head over to the blog and see what they have done for your inspiration.

Little Miss Muffet Stamps has been creating images for a Sharing Handmade Kindness campaign and though this wasn’t specifically for that campaign, it is still a great image for this – I know so many fireman and I think they will love this.

lmms-sunbonnet-fireman-copy

I decided to try out a “use your scraps technique” from Jennifer McGuire’s recent post and while I didn’t inlay the sentiment this time, I love the look of this background and I love that I used up some of my scraps…

Recipe:

  • Images: Sunbonnet Fireman Ladder Digi from Little Miss Muffet Stamps
  • Sentiment: Thanks Die from Simon Says Stamps
  • Paper: White cardstock and Red Poppy cardstock (PTI), Black cardstock (Recollections), and SCRAPS
  • Ink: Copics
  • Other: Basic and Polka dot backdrop dies (A Jillian Vance Design), Circle die (Spellbinders), Stitched Rectangle die (Simon Says Stamps), Sprinkles (Doodlebug Design)

Come on over and join in on Challenge #148 – Anything Goes!  There are prizes… For our prizes, one lucky winner will be awarded a $10.00 Gift Voucher to the LMMS shop. We like to select a couple other projects to highlight as well.  Good Luck!

Thanks for stopping by!!

Lyn


Share this:

  • More

Like this:

Like Loading...

Shine Bright Tiny Dancer!

16 Wednesday Sep 2015

Posted by Lyn T in CAS, From The Heart, Techniques, Tutorial

≈ 12 Comments

Today I have a fun card for some mid-week inspiration at From the Heart Stamps. This week’s challenge tWist was to create an interactive card – I LOVE interactive cards!!

I decided to finally try to create a spinning card. The first time I saw this technique, I thought that the “faithful friend” image called SHINE would be perfect for it. I saw a really quick and perfectly explained tutorial at Kristina Werner’s blog; so I CASED it. I mean…it was perfect don’t you think!!??FTHS Shine 2 copyI took several pictures to try to show how I created it, but ask questions in the comments if it was unclear.

  1. I copied the image onto a word doc. Then I copied it again and flipped the image. Make sure to check on the format tab that both images are the same size so that when you fussy cut them, they match up.
  2. Color the images at the same time to try to keep their coloring consistent. I added wink of stella all over her dress so it would well…wink when she spins 🙂images copy
  3. After adhering twine/thread (I used shiny silver) to the back of one of the colored images, glue the two images together, making sure to line them up and trim any “off” pieces from the images.thread copyimage together copy
  4. I ran a black Memento marker around the edges to make them look more finished.
  5. Cut a hole out of your card front and out of another piece of card measured to the same size as your card.
    • To make sure that they matched up,  I lined my die cut up the way I wanted it on my card base and cut it out.
    • Then lined the other piece card up underneath with the hole on top.
    • I popped the die back into the hole an drew a line with pencil.
    • Then I was ready to die cut my circle on the second piece… I just lined up the pencil mark and the die and ran it through the cuttlebug.spinner supplies copy
  6. NOW, tape the top thread of the image down on the front of the card at the top of the circle. Pull it tight and tape down the bottom thread at the bottom of the circle.
  7. The put some strong glue over it, and adhere the top piece over that – this covers the strings and created a sandwich with them in the middle.
  8. Let it dry before you play with it or the strings will get slack in them (Don’t ask how I know…)
  9. I loved Kristen’s idea of mounting dark paper on the inside of the card so that the image would “pop” – I used a star background with versa mark ink and clear embossing powder on a black card so it would move a little.black liner
  10. Instead of drawing a free-form circle, I laid the die down and doodled around the outside
  11. I had an awesome sentiment from Lawn Fawn that went with all of my card elements so I added it and that is all…EXCEPT for spinning her around a few times and closing the card – then when someone opens the card she does a ballerina spin for them 🙂

Want to see her spin?? CLICK HERE OR on the picture below 🙂FTHS Shine copyWell I hope enjoy and feel inspired to create your own interactive card this week!

Recipe:

  • Image: SHINE digital image by From the Heart Stamps
  • Background: Tiny Stars background stamp (Hero Arts)
  • Sentiment: Let’s Bokeh clear stamp by Lawn Fawn
  • Paper: White card(PTI) and Black card (Recollections)
  • Ink: Copics – R20, R21, R22, R24, YG000, E00, E02, E11, E21, E33, E35, E37, E29 Versa Mark Ink, Wink of Stella, Versafine Onyx Black
  • Other: Basic Backgdrop and Polka Dot Backdrop Dies (AJVD), Circle Die (Spellbinders), Clear embossing powder (WOW)

Challenges:

  • Happy Little Stamper – CAS Coloring ( I still kept is CAS even though it has moving parts.)
  • Little Red Wagon –Challenge #307 – Try Something New
  • Cards Und More – #141 No Designer Paper
  • Live Love Cards’ September Challenge: “Sparkle & Shine”

Thanks for stopping by!

Lyn

Share this:

  • More

Like this:

Like Loading...
← Older posts
Follow My Purple House on WordPress.com

Pages

  • A little bit about me…
  • Design Teams – Past and Present
  • FTC Disclosure

Design Teams:

In Honor of Faith Skrdla

Archives

Recent Posts

  • Watercolor Unicorn
  • Gnome For Christmas
  • Splitcoast Stampers Tag card – TLC Challenge
  • SNSS November Instagram Hop

Categories

Art Journal Bible Journaling Birdie Brown Birthday Bugaboo CAS Color Pencils Copics Delightful Inspiration Designed to Color Doodle Dragon Studios Doodle Pantry From The Heart Guest Designer Hambo HYCCT Jellypark Lacy Sunshine Little Miss Muffet Sketch SplitCoastStamper Sunshine Mail Sweet 'n Sassy Stamps Techniques The Alley Way Stamps Tiddly Inks Tutorial Uncategorized Valentine Watercolor

Contact me:

rebeccaof@yahoo.com

Create a free website or blog at WordPress.com.

Privacy & Cookies: This site uses cookies. By continuing to use this website, you agree to their use.
To find out more, including how to control cookies, see here: Cookie Policy
  • Follow Following
    • My Purple House
    • Join 67 other followers
    • Already have a WordPress.com account? Log in now.
    • My Purple House
    • Customize
    • Follow Following
    • Sign up
    • Log in
    • Report this content
    • View site in Reader
    • Manage subscriptions
    • Collapse this bar
 

Loading Comments...
 

    %d bloggers like this: