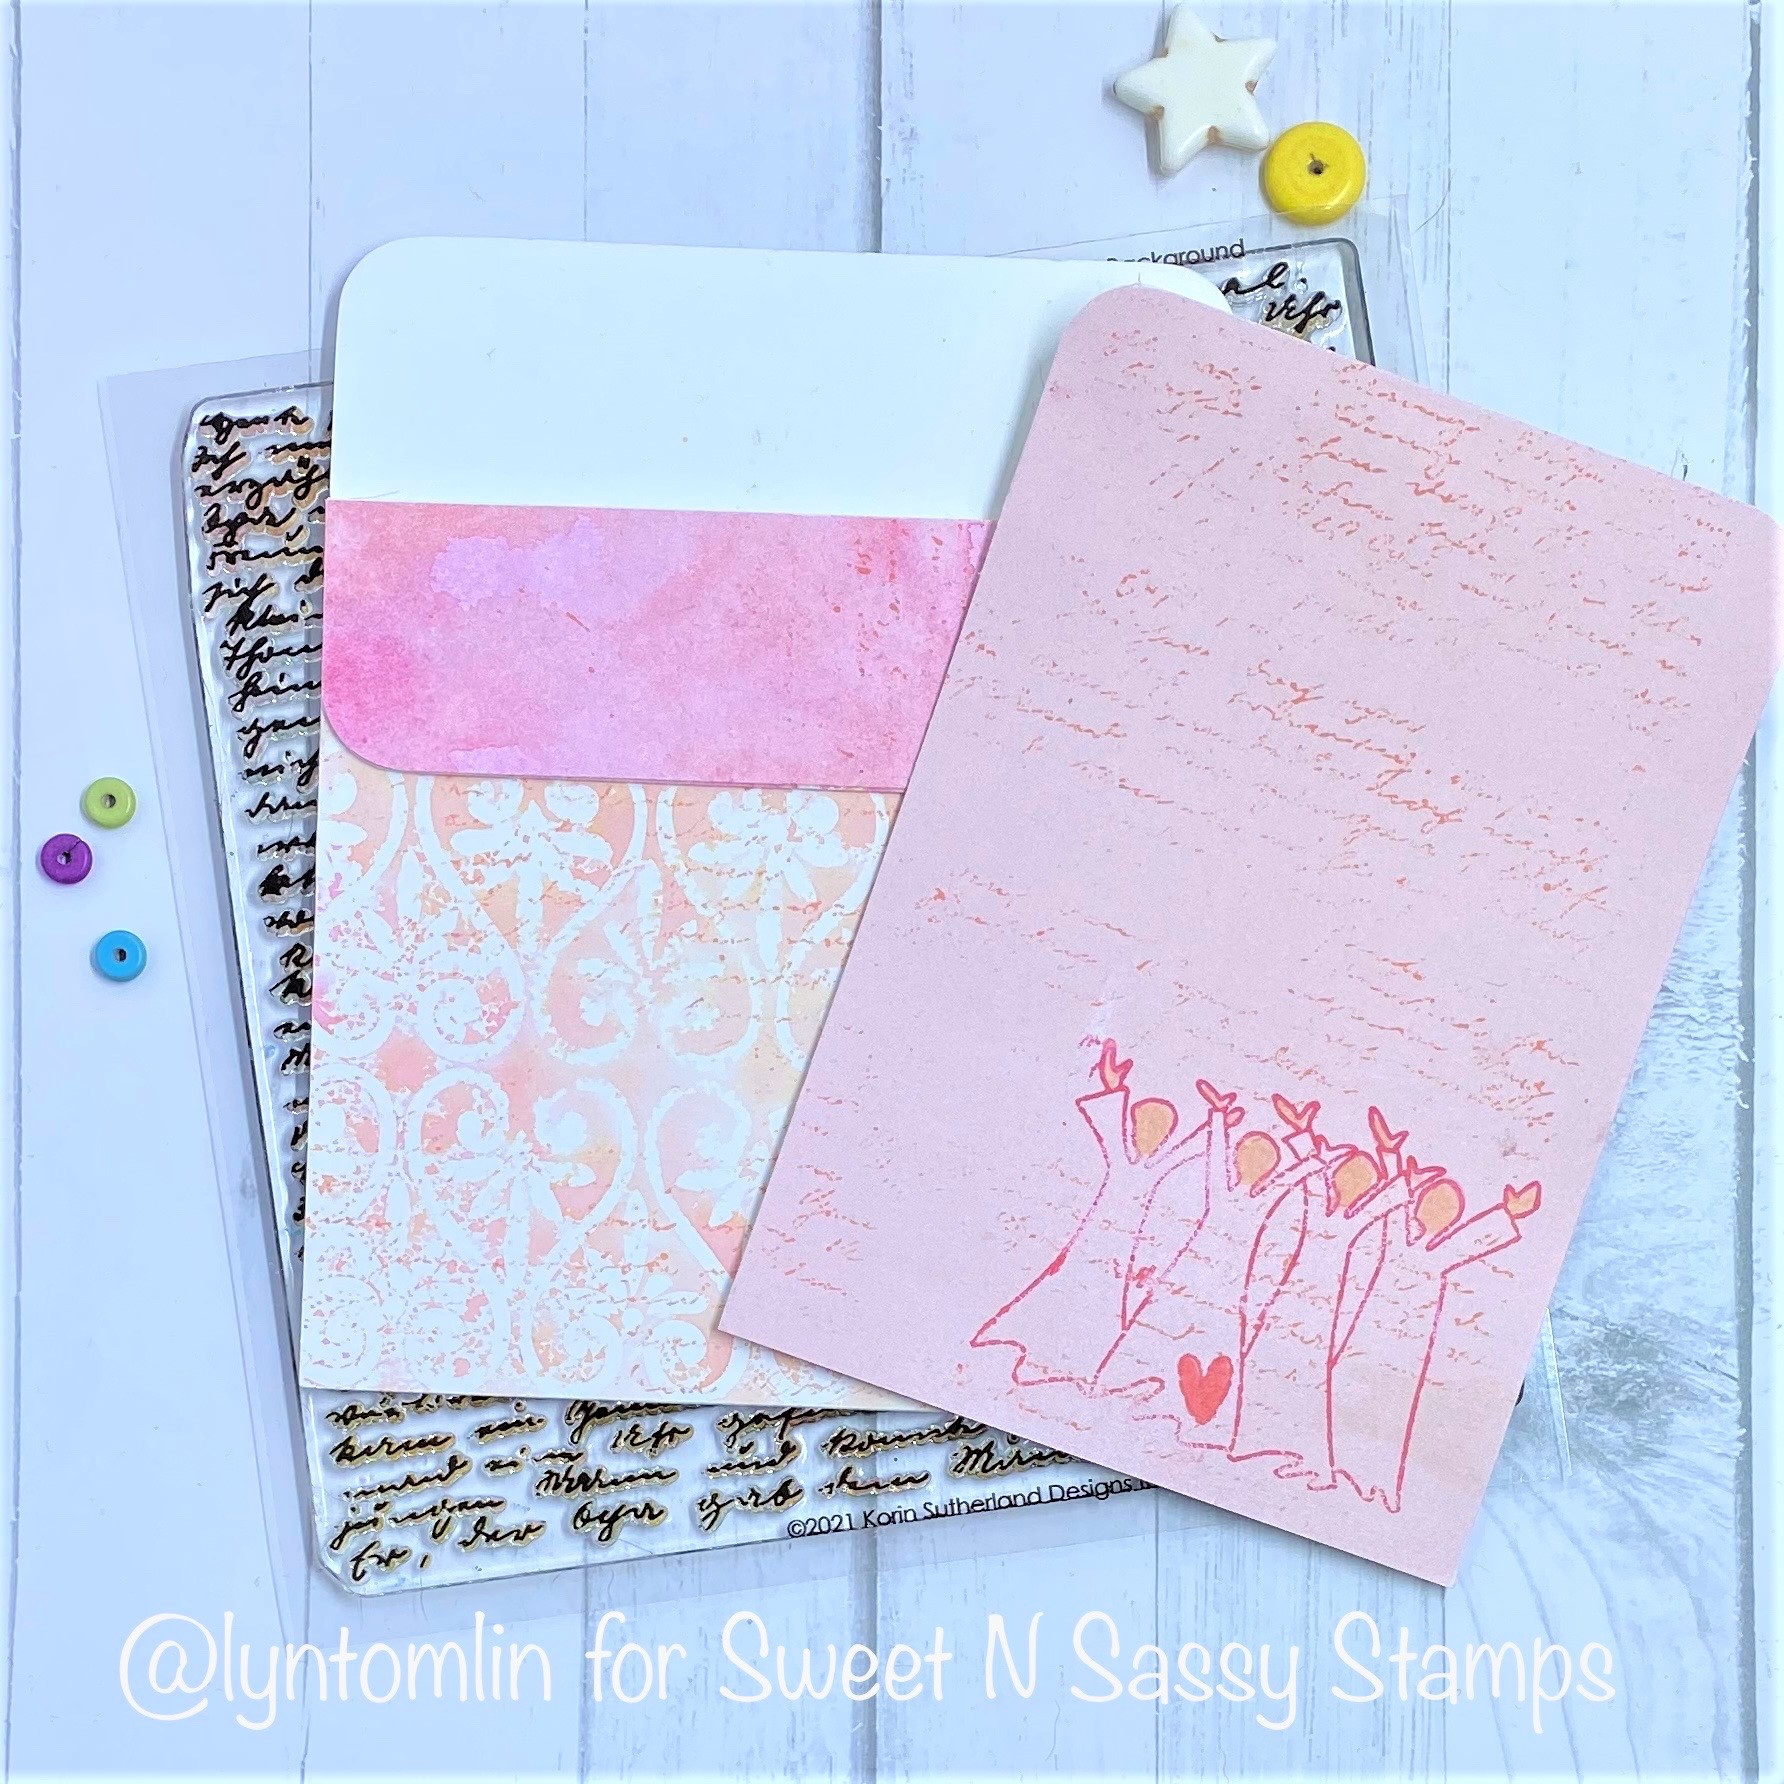
Happy Day After Thanksgiving! I hope you had a wonderful Thanksgiving full of family and fun! I am still trying to recover from all that food haha! Today I have a simple pocket card for you. I dug through my stash of backgrounds and then took them up a notch by simply adding the new Script Background stamp (from Sweet N Sassy Stamps)in a coordinating color. I also created a note card to go into the pocket and gave it the same “subtle” treatment and also added an image from the Wonder of Wonders set. I colored the faces, hands, and heart and let the rest blend into the background.
I think this will be a unique card for someone who needs some love and encouragement but what do you think?
So October is over. How did that happen? This has been a really tough month. I lost a cousin to covid and my mom got it a week later. It was pretty stressful to say the least and my creative juices just got up an walked out the door. In order to keep my stress at bay this month, I found myself doing a lot of coloring. Then all of a sudden the month was almost over and I had a stack of colored images mostly from Warm Winter Friends – I also got the dies for these and it was so so simple to get them all cut out. I won’t replace my fussy cutting (which is also relaxing somehow) but it sure will supplement it.
I dug through my basket of backgrounds and paper and found inspiration for all of my sweet friends. I turned on some Hallmark Christmas movies and got a batch of cards that I really love but what do you think?
My First Warm Winter Friend is the owl. I had a background with a tree made from dots (Texture Tiles 8) I added a gift under the tree and a sentiment from Christmas Wordfetti. This one is pretty fun.
My second friend is a sweet bunny. I found an embossed/watercolor background using Folk-art Snowflakes and a piece with a circle and a piece I could use as a hill and a banner for my sentiment… This one is so sweet!
My third card uses 2 friends (a fox and a deer). I found a stamped sentiment in my stash from Winter Hugs that I thought would be perfect for a die cut hill and some snowy digi paper I found. I think this is my favorite
Finally, I had a colored poinsettia left on my desk so I created a circle focal with the poinsettia and a sentiment from Christmas Wordfetti. The background was created with a discontinued stamp set but it was in my stash so it had to be used right??
WOW! It took me all month to make these but I am really loving them and can’t wait to send them out to some special friends! I hope you were inspired. If all you have time or creativity for today is coloring, just color! You will find that when you are ready to create, it is really nice to have pieces in your stash to support your ideas!
Today we are having an Instagram hop to celebrate the SEPTEMBER Sweet ‘N Sassy Stamps NEW RELEASE Inspiration Insta-Hop! In order to play along, follow the steps below…
1 ❤️ this post. 2. Follow me @lyntomlin AND @sweetnsassystamps 3. Leave a comment for a chance to win a $25 gift code to Sweet ‘N Sassy Stamps. Winner will be announced on September 22, 2021 on Sweet ‘N Sassy Stamps IG.
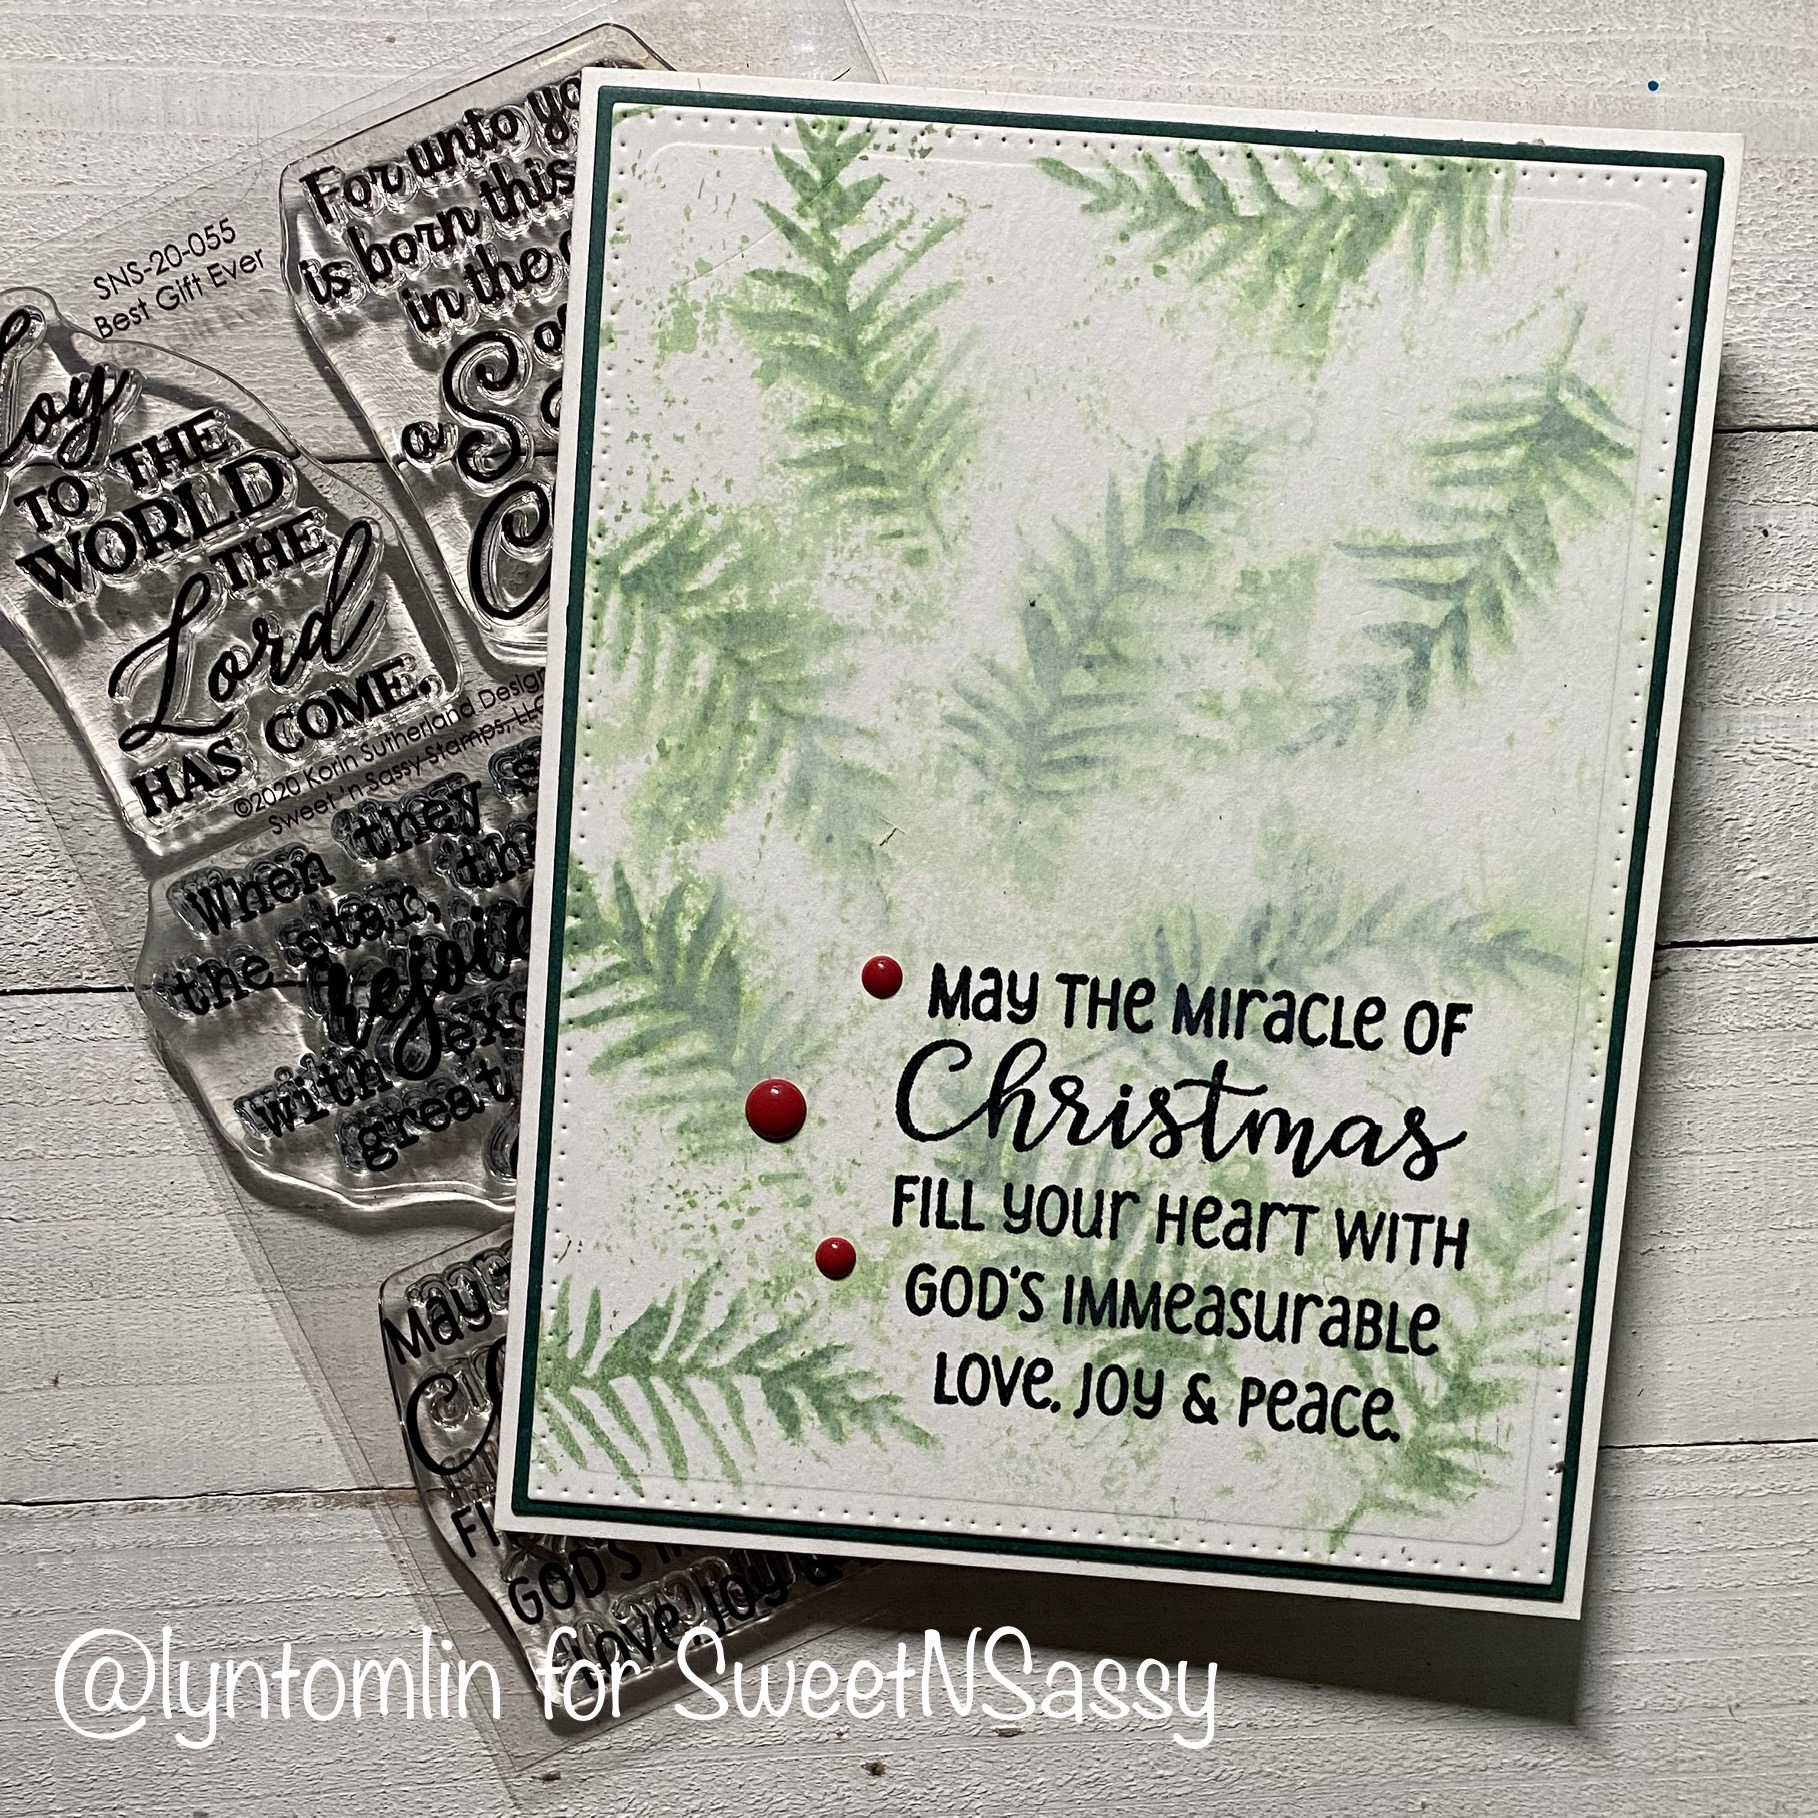
For my project today, I “kind of” used the Double Water Stenciling technique from SplitCoast Stampers which creates 2 card panels by inking and spritzing water through the stencil onto one card panel (this is the Fern Fronds Stencil) then I flip the stencil and place the inky wet side onto a second card panel. I stamped my sentiment from the Best Gift Ever set. I added enamel dots to one card and I colored and cut the poinsettia from the new Endless Love set for the other. They are simple but I like them!
I had a painted wood slice on my desk from a recent project and so I decided to make a quick gift tag with the Best Gift Ever set and that is that for today’s project – what do you think?
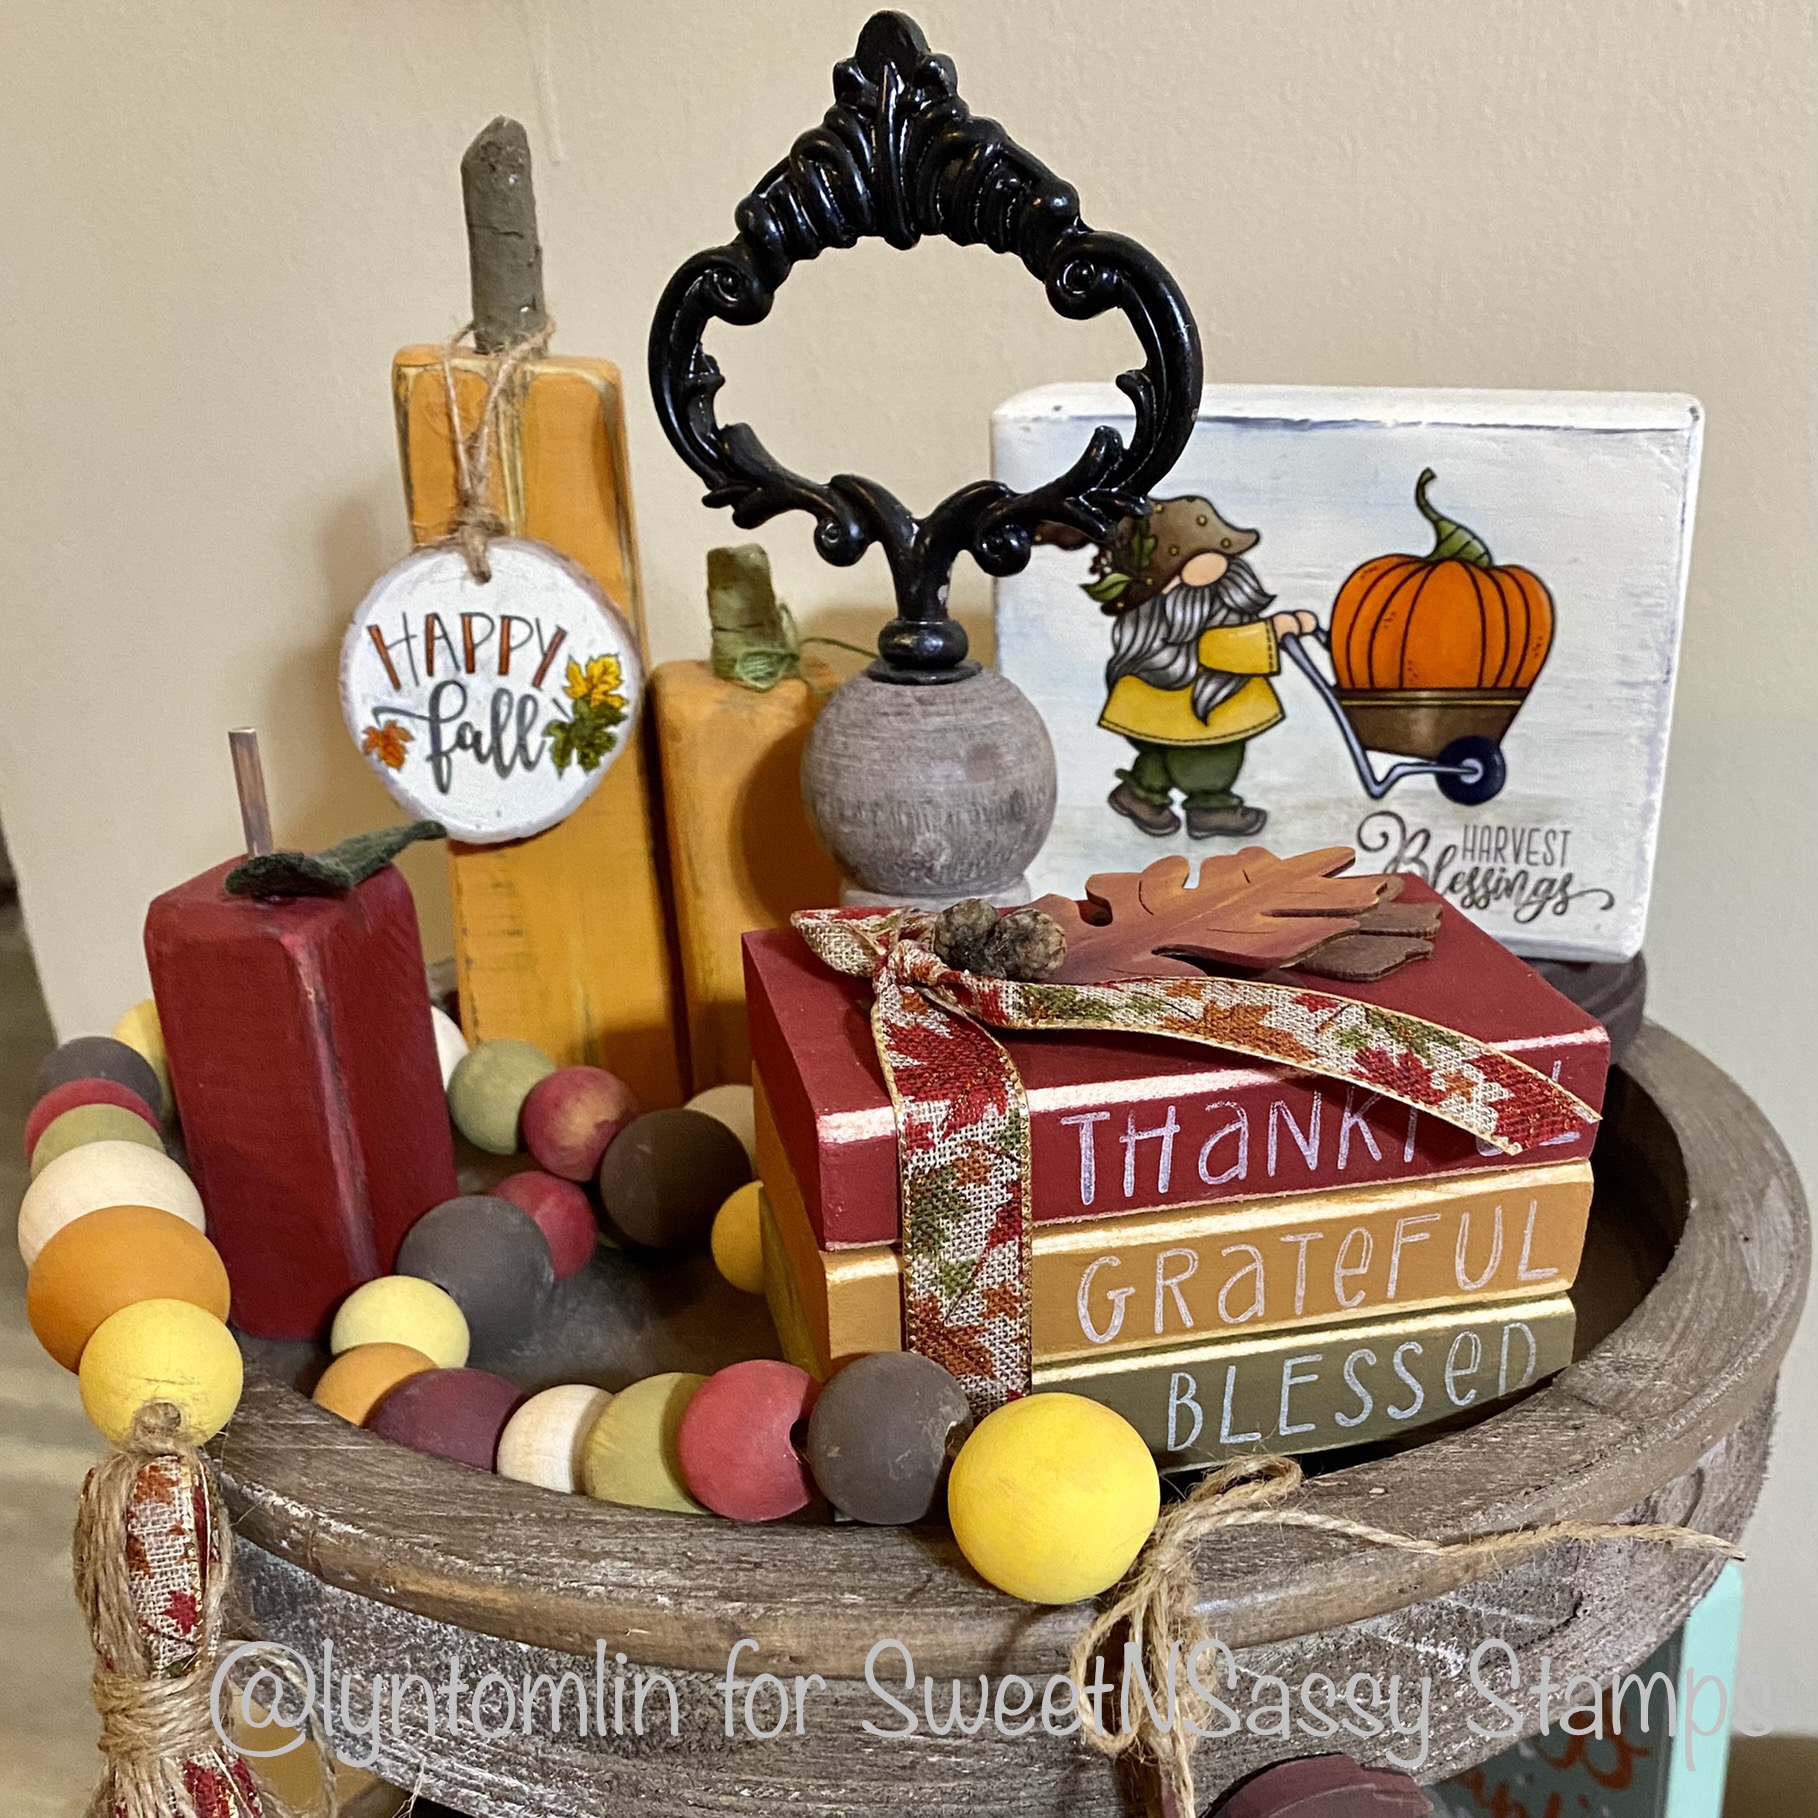
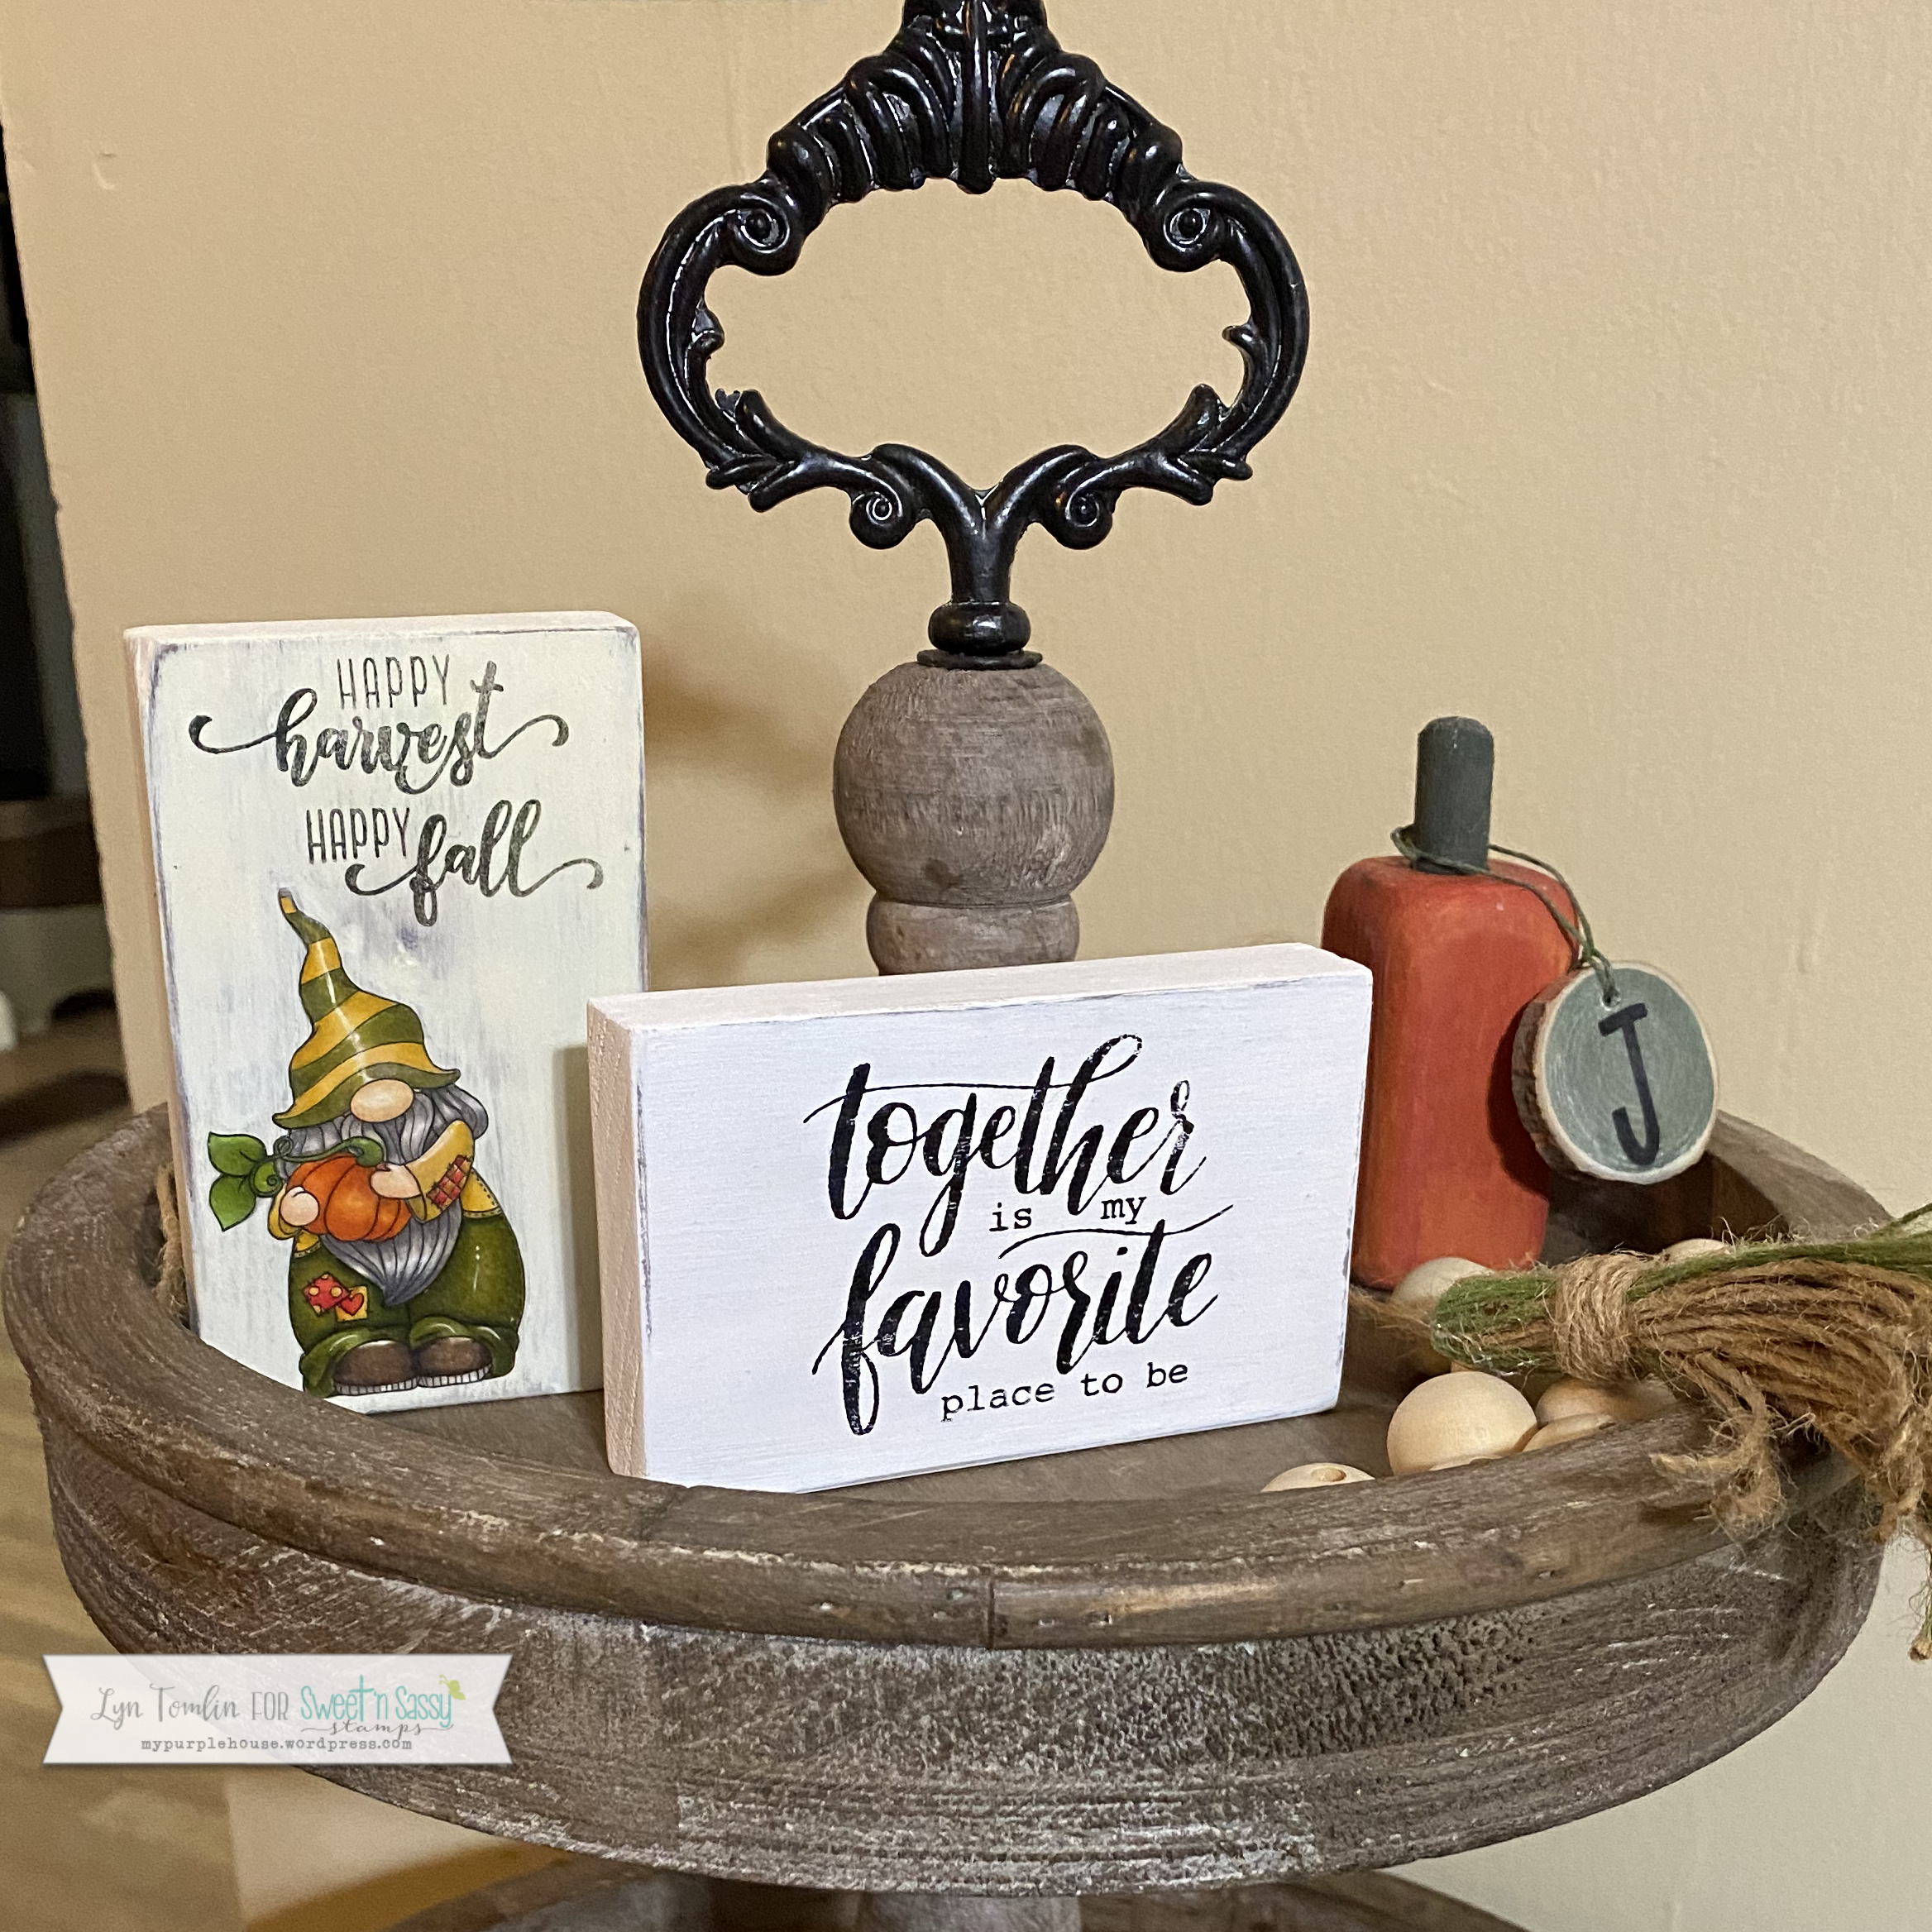
I have been having a great time stretching my stamps and have loved the fun wood block decor I have created this summer. My first batch were made for my sister’s birthday (for her tiered tray) and I had the hardest time giving them over (haha). Sooo what’s a girl to do but make herself some (and get a tray to go with them – sigh.) Today I have lot of samples to show you!
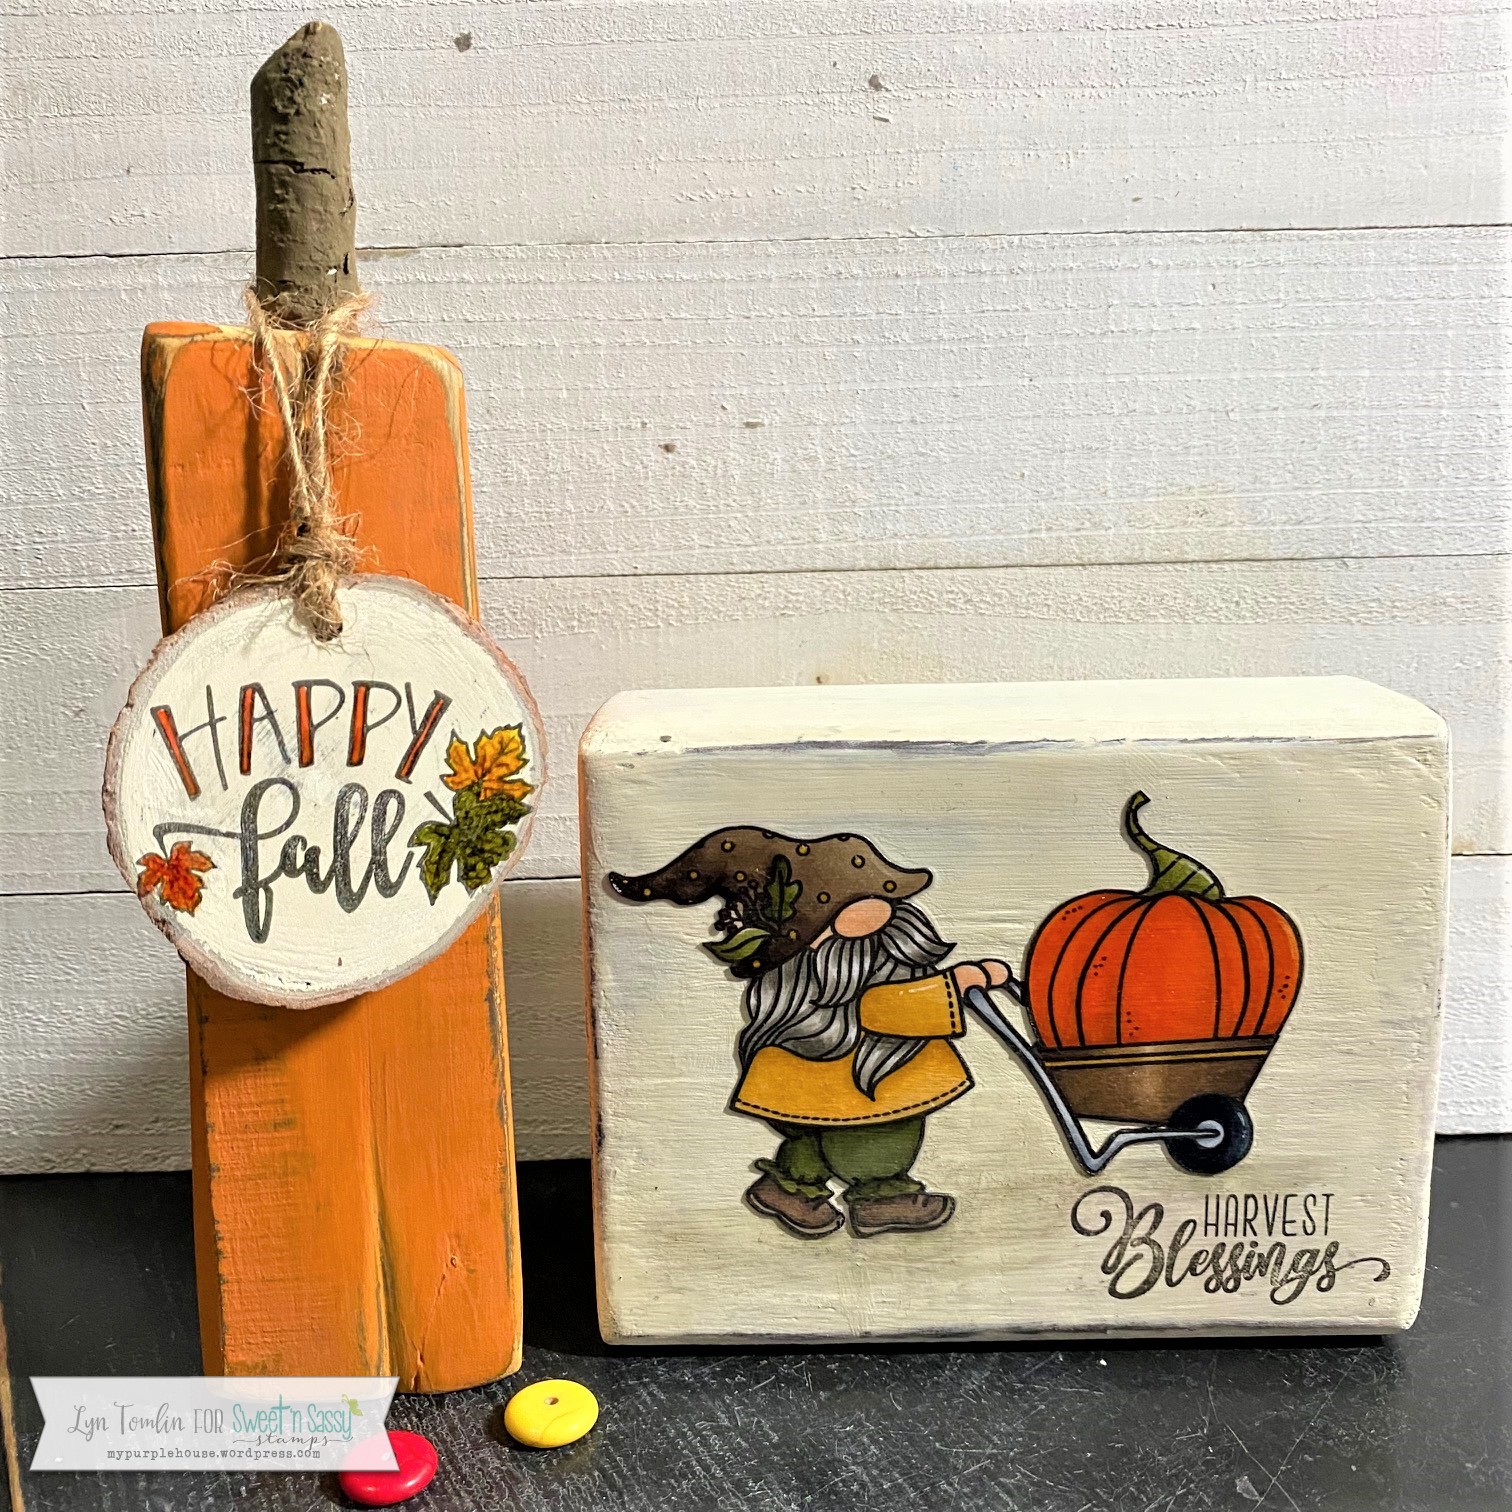
My first projects used a wonky piece of scrap wood, a wood slice, and a “stem”/stick from my yard to create pumpkin with a little sign using Fall Breeze. Then I grabbed a scrap of 2×4 for a block using Autumn Gnomes with I modpodged onto the block and and a sentiment from Rhubarb’s Harvest (stamped with Stazon)
Then I painted up some beads and strung them to create a garland. Then cut up a 1×3 to create a stack of books. I painted them colors to coordinate with my garland and using Bitty Minnie Alpha I labeled my books with Thankful, Grateful, and Blessed – this set is PERFECT for this project! With some scrap 2×2’s I added another little pumpkin and an apple. This all filled the top tier of my tray and it all is made by me – it makes me smile every time I see it!
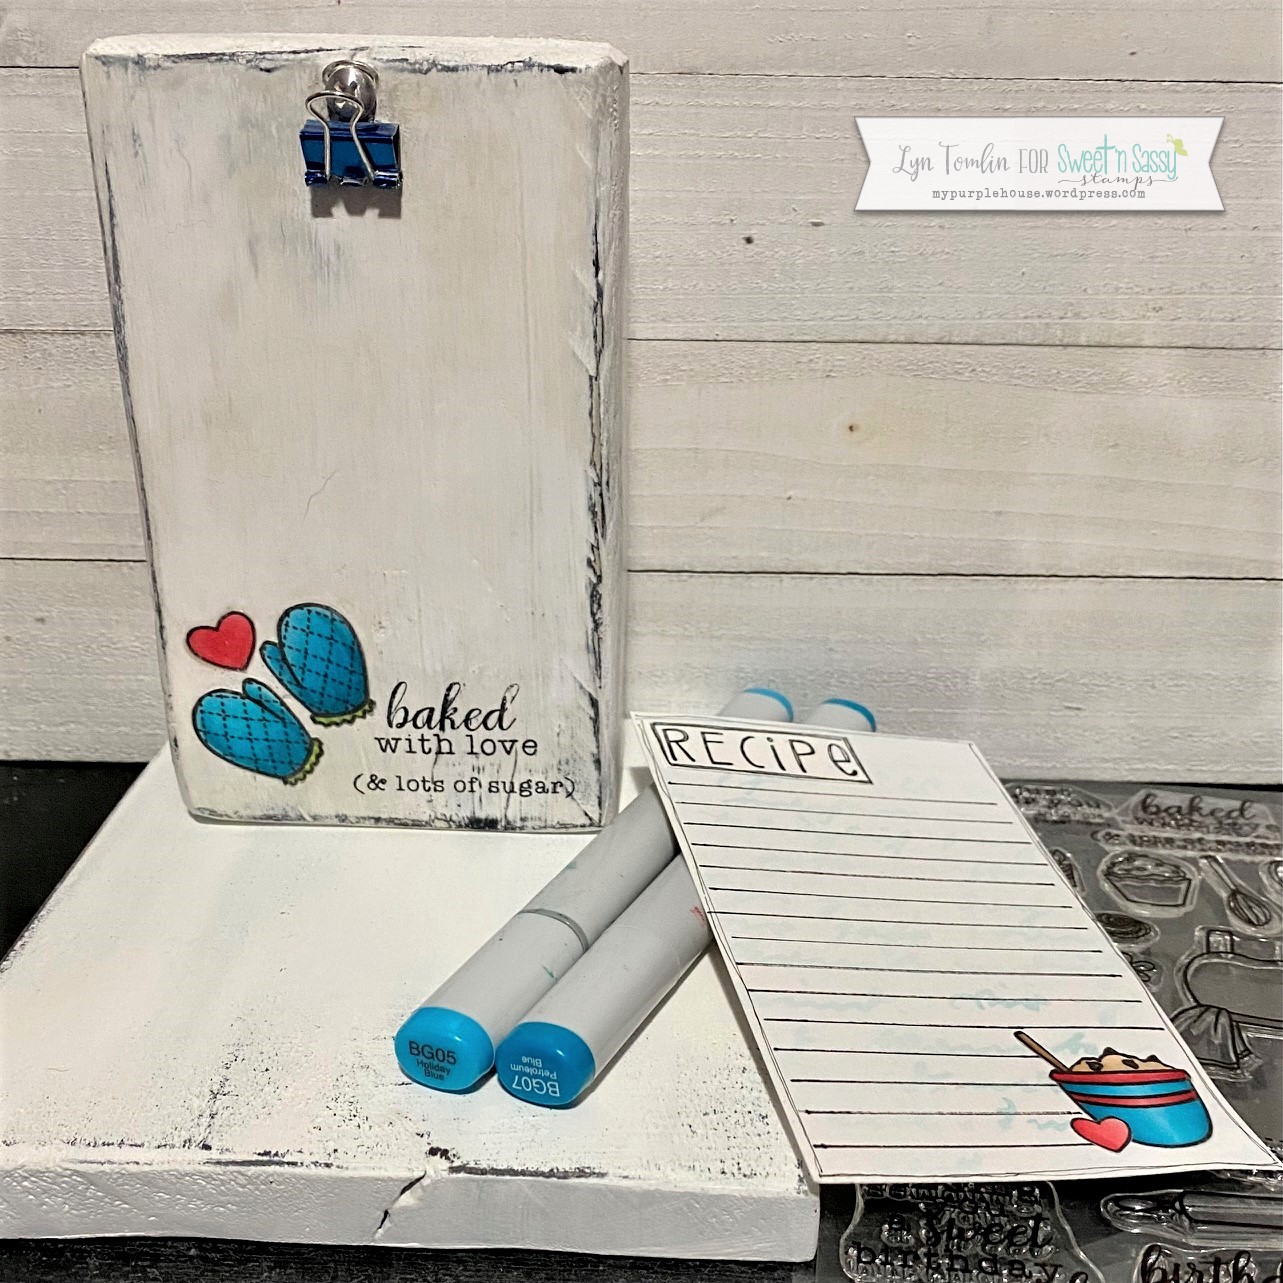
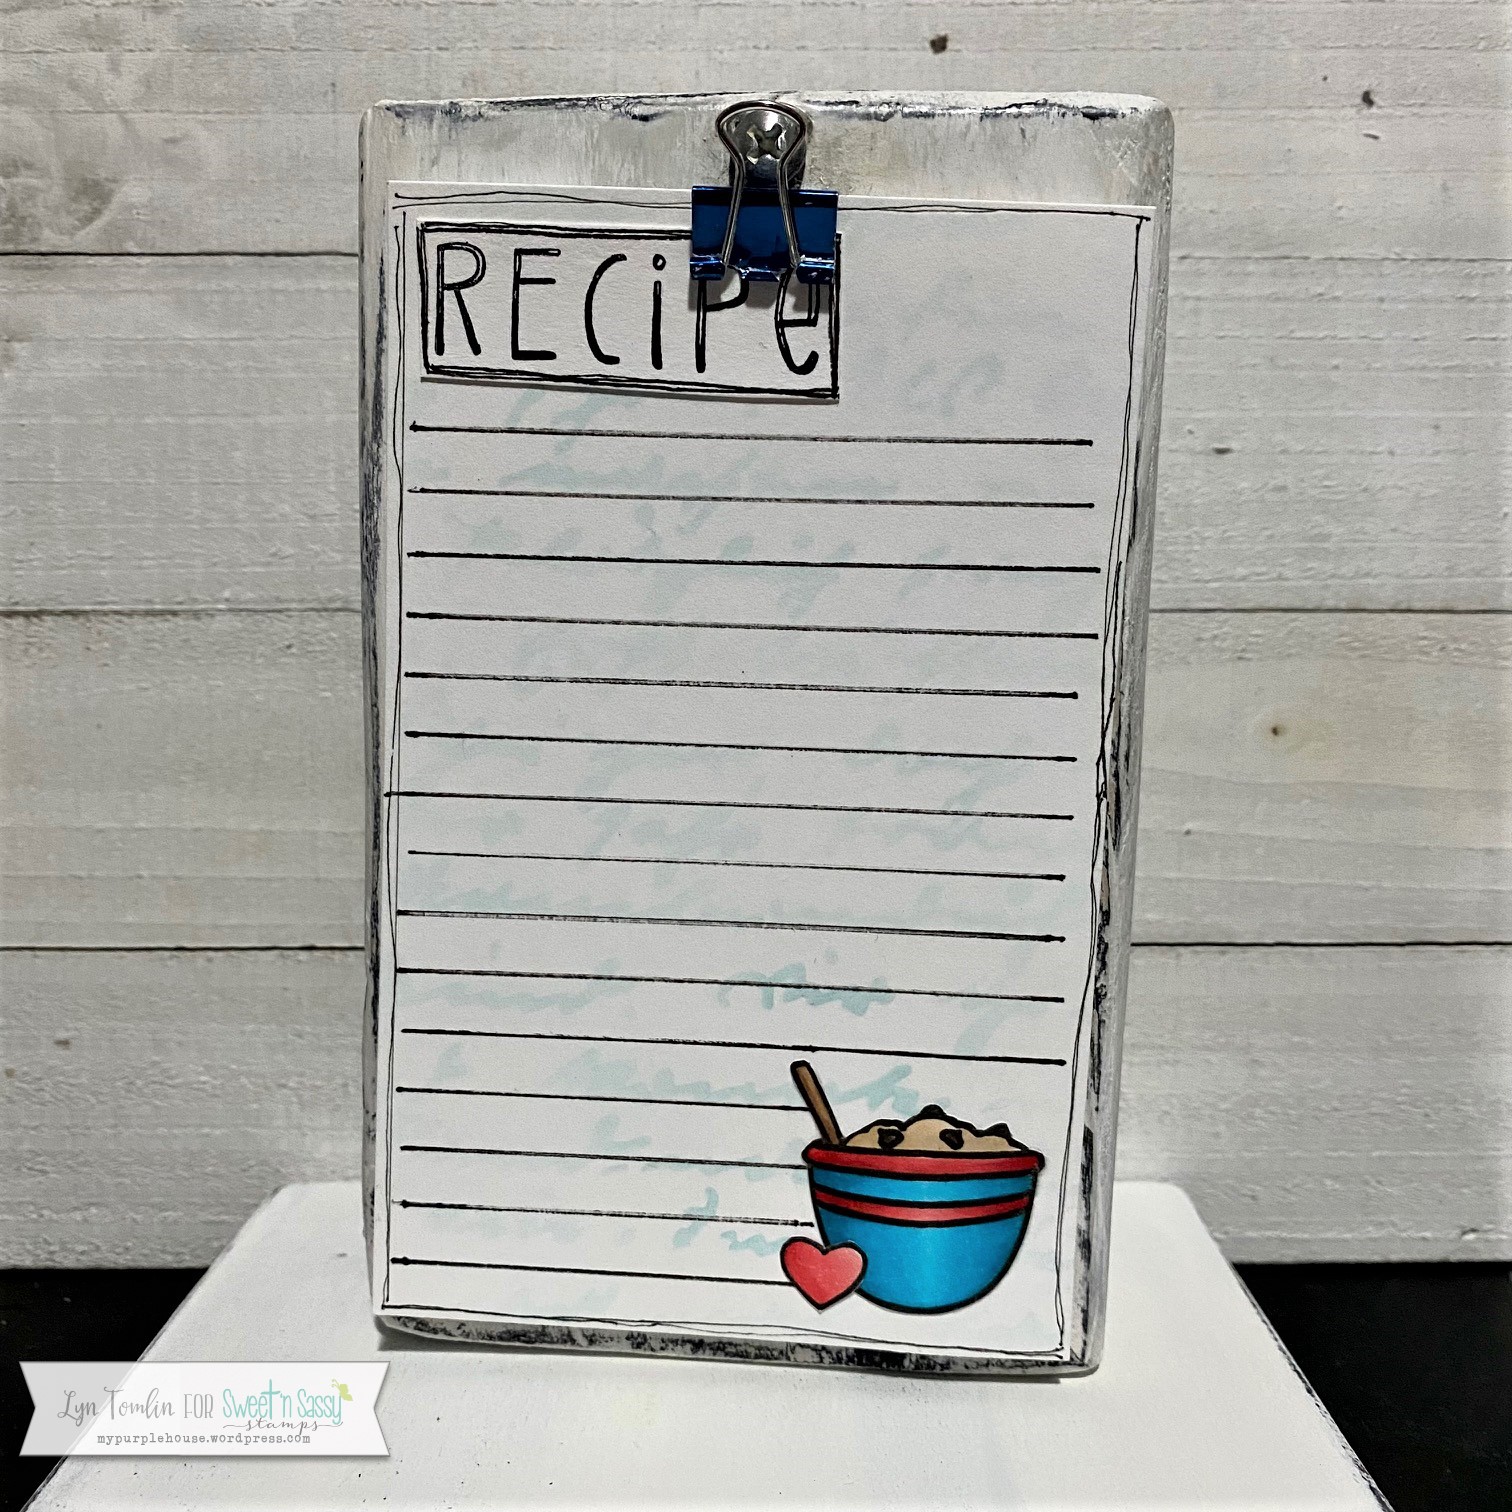
Finally, I decided top make a fun little recipe card and holder with the Sweet Treats set. This isn’t for my tray but it was the last of my cut wood blocks (but I will be making more haha!) I colored the image with Copics and fussy cut it. I modpodged it onto the block (painted with chalk paint) then screwed a little clip to the top. I stamped the sentiment with Stazon and that is all there was to this little project.
These are all super fun and very easy! I hope you are inspired to try something similar – If you don’t have the blocks, you can sometimes get them from Home Depot from the scrap pile – where there is a will there is a way right 🙂
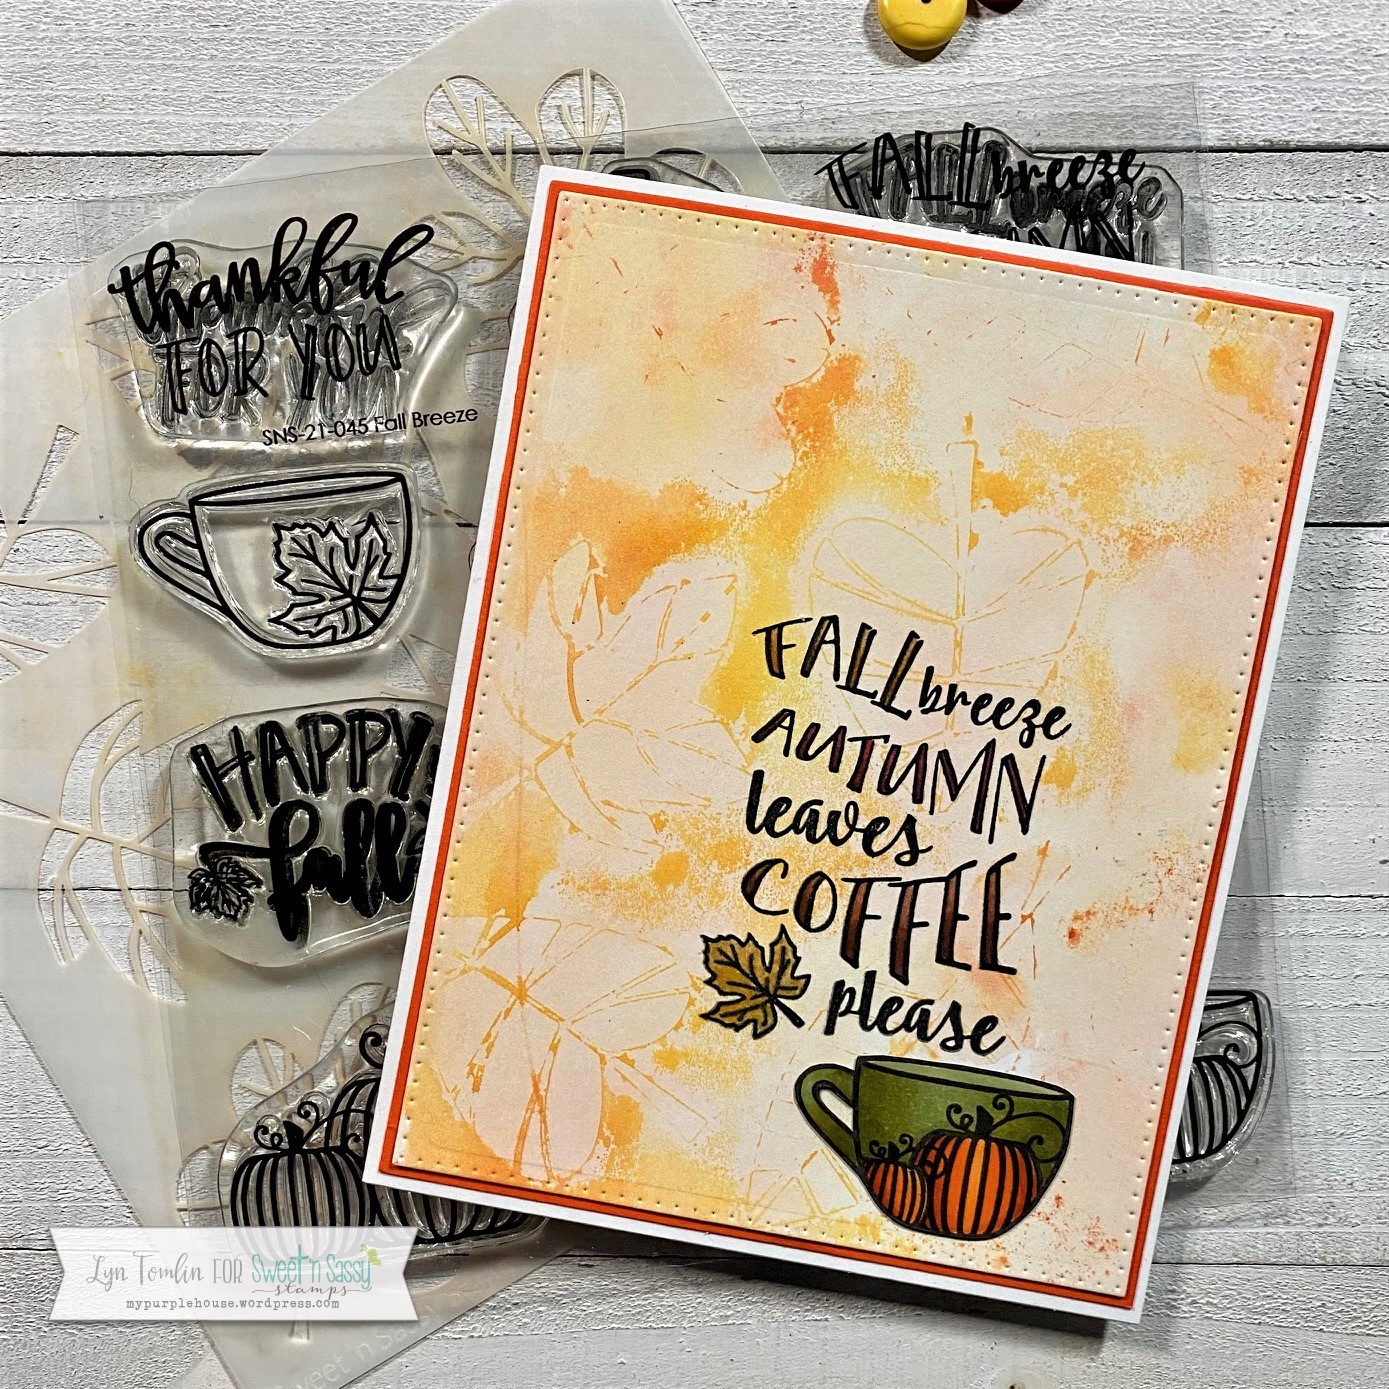
Today I am playing with two of the Sweet N Sassy August stamp sets Fall Breeze and Autumn Gnomes and the Fall Leaves Stencil. I tried a some different techniques with the stencil to give myself 3 unique backgrounds. Then I used the simple sentiments and images from my stamp sets to finish off my cards.
First up… I ran my stencil through my embossing machine. You can’t see it very well but it is slightly raised. While the stencil was still attached to my cardstock, I lightly brushed on some distess inks. I stamped on the sentiment from the Fall Breeze set and colored in the outlines of the words. Super simple but fun!
Second (and third), I did some ink blending on Bristol Smooth water color paper. I laid the stencil on top and spritzed it heavily with water with caused the ink underneath to run a bit so I lifted the stencil and laid it onto a clean piece of Bristol paper for a much lighter, subtle look. I added sentiments and small images to both of these backgrounds and they were pretty much finished.
I hope you were inspired to try out your stencils in multiple ways and see what you get – I think you will be happy with the results!
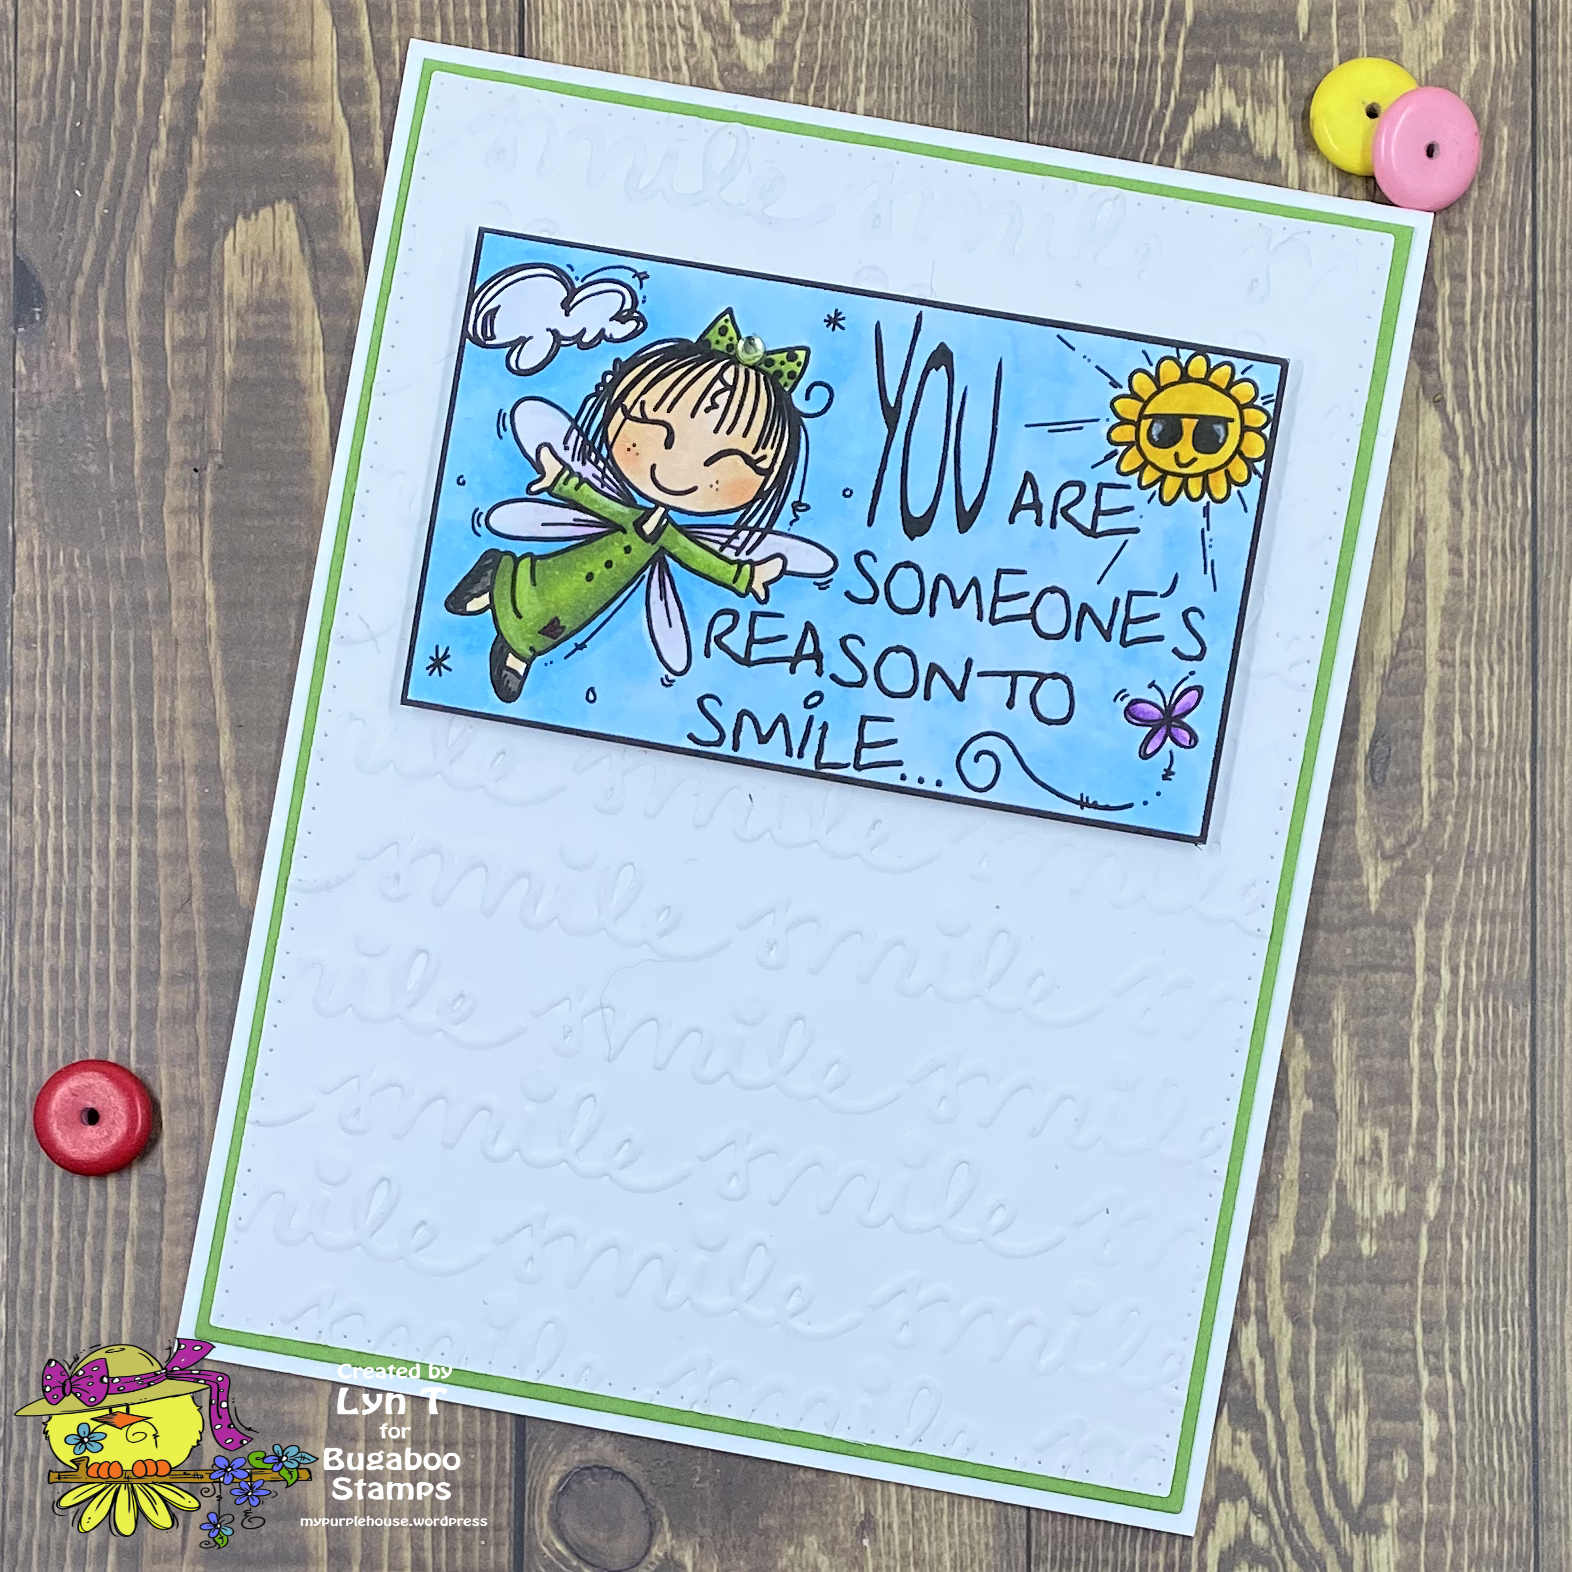
I am so sad that Bugaboo stamps has closed down! I had already created this acrd for the August ATG challenge though so decided to post it anyway…
I have a clean and simple card using a super cute embossing folder that I haven’t pulled out in a long while and I am not really sure why not? I mean what is sweeter than a smile embossing? Maybe this sweet block by Bugaboo called Someone’s Reason! I colored it up with Copics and cut it out and popped it on fun foam before putting it on my embossed panel – soooo sweet!
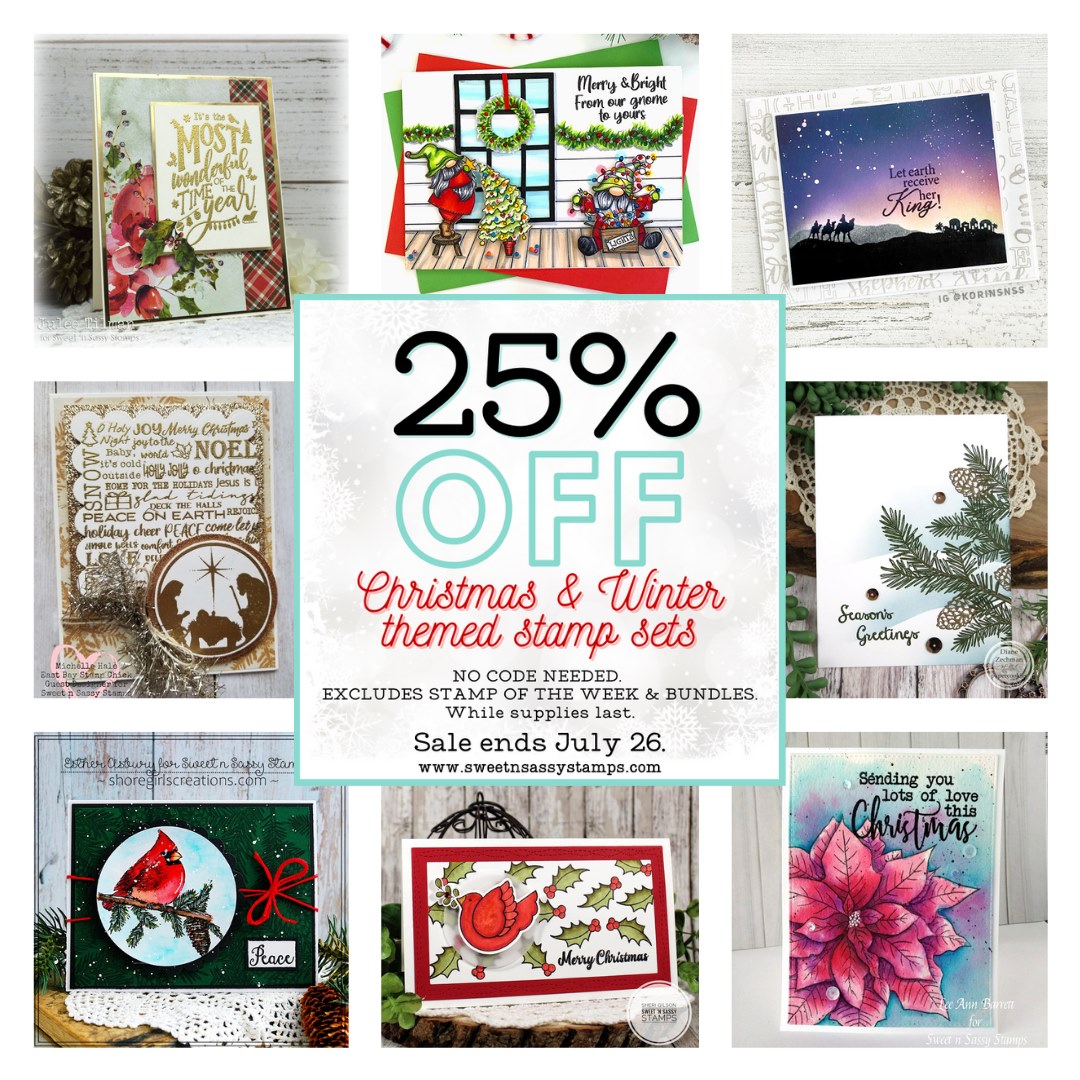
Today I am using All Wrapped Up. It is one of the stamp sets in this week’s Christmas in July sale – now through the 26th, Christmas and Winter sets are 25% off.
For my projects today, I have gone with non-Christmas cards and created birthday cards. I mean ultimately, Christmas IS Jesus’ birthday so maybe they are Christmas cards. Hmm…
My cards are fairly clean and simple but they are created using different coloring mediums.
For my first project, I did a little masking with most of the gift boxes to create a PILE of gifts. I inked them with Versaclair black ink on Neenah Solar white. I colored everything with polychromos pencils and added a sentiment (heat embossed on black cardstock) from the Birthday Wordfetti set. To finish it, I simply mounted it on a black card base.
For my second project, I used the stack of gifts again but this time colored it (and the bow) with Copics. I fussy cut the stack and the bow. I cut off the top gift to add to the front of the stack and added the bow to the top gift – I glued these onto a card panel, mounted that on blue cardstock, then mounted that on a Neenah Solar White card base. My big sentiment banner is from Bold Birthdays.
That is both of my Christmas in July projects. I hope you are inspired!! Check out all of the Christmas and Winter stamps – 25% off until the 26th…no coupon code needed!
I don’t know about you guys but lately I have been seeing some adorable hand painted signs and tiered tray decorations. My sister decorates her tray for all the seasons. She cuts out the image on a silhouette and “weeds” out the image to leave a stencil of sorts then adheres that to her wood piece and paints through the stencil…NOPE! That is too much work for me!
This weekend we celebrated her birthday and I decided to see if I could create a few mini signs for her tray using stamps…YES! That is more my speed!
I took scrap wood blocks from another left over project (They were about 3″X4″.) I also painted onto a wood slice tag I had. You can use any wood pieces you have. I painted them with chalk paint. When it dried, I sanded it for a smooth surface and the corners for a distress look (Paint a under layer of darker color if you want darker distressed edges.) Then with STAZON inks, I stamped firmly only my block. I let it sit for a a little longer than I would with paper then pulled it off – it really stuck down so don’t be surprised if you have to pull it with a little strength (but be gentle :))
That is it. It turned out precious! And it didn’t require all those steps – I just dug through my stash of stamps and saw them with brand new eyes! It was awesome to have new uses for them. I have a stack of them on my desk now begging to be used on the next “Sign”. Yay – this project was a win twice! And with Christmas being just down the road, it may be a great gift idea too. Hmmmm…
For my first project, I found a little piece of scrap wood (3″x4″x1″ thick). I painted an under layer of black chalk paint, then when that dried, I painted a layer of white chalk paint. When that dried, I sanded the edges for a distressed look, wiped it down then using Jet Black STAZON, I stamped a sentiment from My Thoughts of You from Sweet N Sassy Stamps (all of the sentiments would have worked for this project but My sister is my best friend and this one seemed most perfect!) This is so simple but so awesome! I love it on the tray!
For my next projects, I created a little pumpkin from a 3″ scrap of 2×2. I painted it up in shades of orange. I drilled a hole in the top and added a dowel for the stem. THEN I created a SIMPLE monogram wood slice sign using an alphabet stamp called County Fair Alpha
Then I painted a scrap of wood (3″x4″ – 1″ thick). I painted it with java chalk paint then when that dried I painted another layer with sheepskin chalk paint, then when it dried I sanded it for a distress looked and glued down a copic colored, fussy cut digi stamp from Sweet Sassy called Autumn Gnome. I stamped sentiments from Fall Remix: Rhubarb’s Harvest with Timber Brown STAZON. For this one, since I had the cut out digi, I added a layer of matte Mod Podge.
I hope you were inspired! I have challenged the Technique Lovers to try this as this week’s TLC challenge at SplitCoast Stampers. Come join the fun!
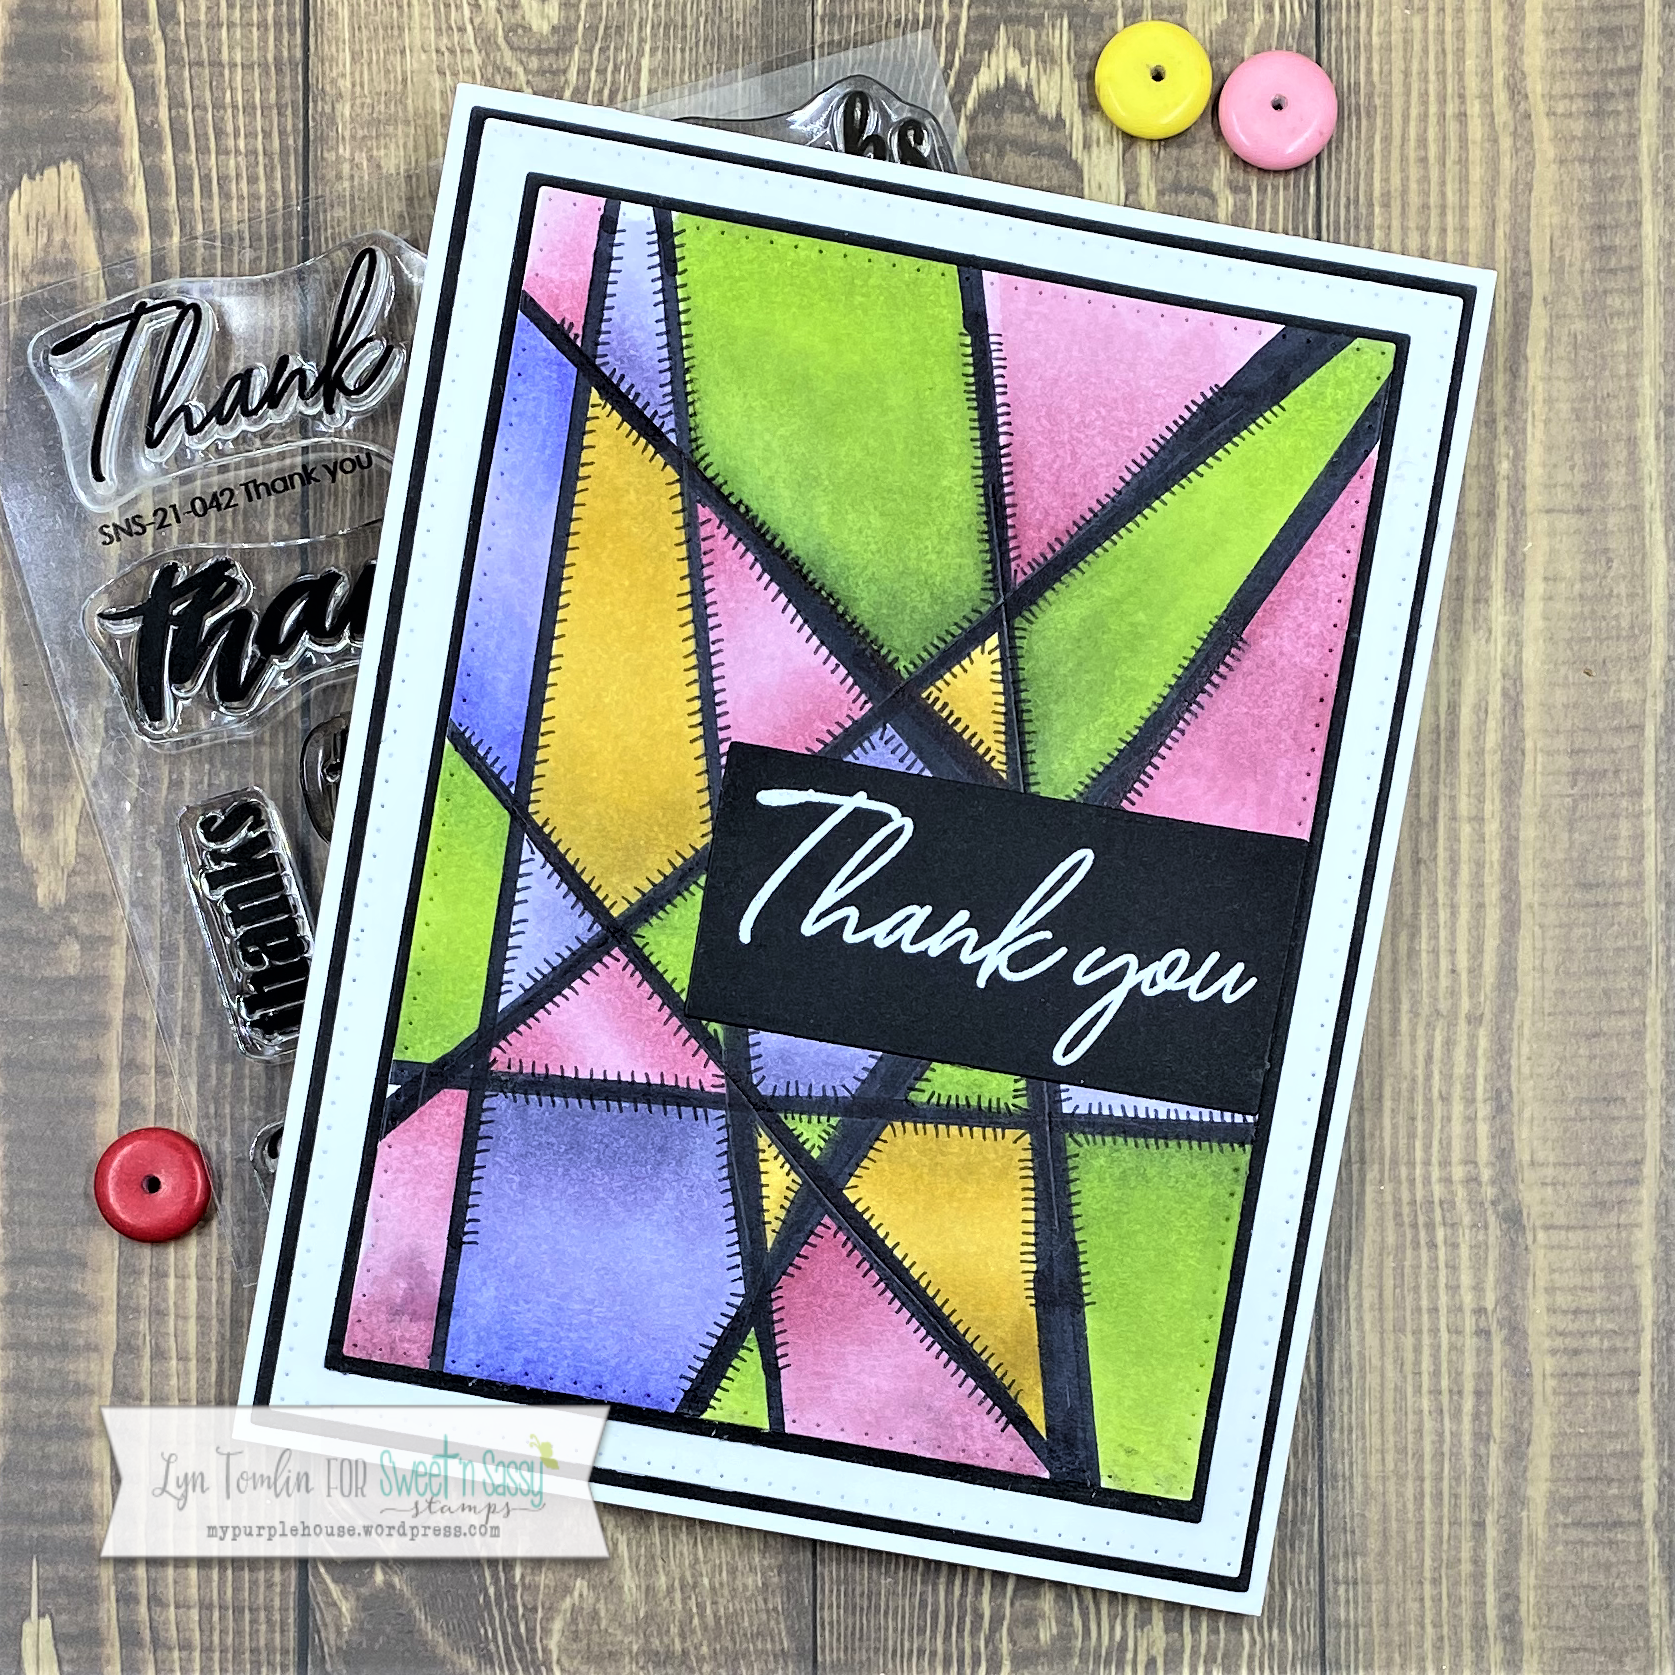
Today I have three Thank You cards using this months “stamp of the month” free with a $60 purchase. It is called (wait for it…) Thank You (haha!)
This set it so fun. There are chunky thank yous and scripty thank yous. They go with so many card designs. For my projects, I pulled some backgrounds together and mostly let the sentiment carry the card. I am pretty happy to have some thank you cards in my stash that are versatile too!
1st – I created a abstract back ground using copics to color the heat embossed my sentiment on black with white embossing powder.
2nd – I used the Background Builder Stripe set to create a fun black and white background, heat embossed my sentiment on black with white embossing powder and mounted everything on red for a pop of color.
3rd – I had a left over chick from March’s Hoppy Spring set and I used it as an accent to a background using the Chicken Wire Stencil (right…). Then I stamped my sentiment onto the background.
I hope you are inspired – this set is seriously worth it! It will be one I go to again and again!
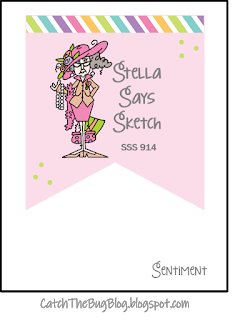
Today we have another Stella Says Sketch Challenge. This month it will be month long.
My project features Scarlette Cupcake – she is so fancy in her long gloves and high heel shoes. I love her!
I just went with it on this one. There wasn’t a whole lot of planning. I cut my image with the banner die before I colored it and when I cut off the flame, I almost started over, but then remembered an awesome yellow flame shaped gem I had in my stash so I just kept moving ahead. I colored her up and then found the cardstocks to match her. I used a piece of washi to look like the top of the sketch and then I took a little liberty with my sentiment placement. I hope everyone will be ok with that because this card was so much fun – it makes me happy! 🙂
I hope you are inspired to join in the sketch challenge with us and have fun!!